|
Jungo WinDriver
Official Documentation
|
|
Jungo WinDriver
Official Documentation
|
Read this chapter in the final stages of driver development. It will guide you in preparing your driver for distribution.
The recommmended way to build and pack a WinDriver based driver today is using our CMake+CPack packaging methods as described in 15.2.3. Redistribute Your WinDriver-based package as a self-extracting EXE and 15.3.5. Redistribute Your WinDriver-based package as a self-extracting SH (STGZ) (depending on your operating system) as this method automates many steps in the redistribution process. If you wish to manually create the distribution package, follow 15.2. Windows Driver Distribution or 15.3. Linux Driver Distribution.
Before distributing your driver you must purchase a WinDriver license.
Then install the registered version of WinDriver on your development machine by following the installation instructions. If you have already installed an evaluation version of WinDriver, you can jump directly to the installation steps for registered users to activate your license.
ℹ️ Note
If you wish to distribute the developed driver with your own driver development kit providing your customers with APIs, or if your driver will eventually be part of a development product or environment, please send an e-mail to sales.nosp@m.@jun.nosp@m.go.co.nosp@m.m so our team could give you some additional information which concerns such destribution method.
Distributing the driver you created is a multi-step process.
First, create a distribution package that includes all the files required for the installation of the driver on the target computer.
Second, install the driver on the target machine. This involves installing windrvr1630.sys or <projectname>.sys, windrvr1630.inf or <projectname>_driver.inf, installing the specific INF file for your device and installing your Kernel PlugIn driver (if you have created one). These steps can be performed using the wdreg utility.
Note also the option to simplify the installation of the <projectname>_device.inf and <projectname>_driver.inf using the generated DriverWizard <projectname>_install.bat script.
Finally, you need to execute the hardware-control application that you developed with WinDriver.
ℹ️ Note
It is also important to mention that all OS references in this document are applicable only to WinDriver versions that officially support these operating systems.
Prepare a distribution package that includes the following files.
⚠ Attention
If you wish to distribute drivers for both 32-bit and 64-bit target platforms, you must prepare separate distribution packages for each platform. The required files for each package are provided in the WinDriver installation directory for the respective platform.
| File | Distribution using WinDriver (No Renaming) | Distribution of a Renamed Driver |
|---|---|---|
| Your hardware-control application/DLL. | Your user application. Note: The value you pass WD_DriverName() should be windrvr1630. | Your user application. Note: The value you pass WD_DriverName() should be your renamed driver name. |
| .sys | WinDriver\redist\windrvr1630.sys | <projectname>\<projectname>_installation\redist\<projectname>.sys |
| .inf (driver) | WinDriver\redist\windrvr1630.inf | <projectname>\<projectname>_installation\redist\<projectname>_driver.inf |
| .inf (device) | Could be generated using DriverWizard | <projectname>\<projectname>_installation\redist\<projectname>_device.inf |
| .cat (for driver INF) | WinDriver\redist\windrvr1630.cat | Can be created using Inf2Cat (provided with WDK). For information about Jungo's Windows Digital Driver Signing Service contact us at: WinDr.nosp@m.iver.nosp@m.@jung.nosp@m.o.co.nosp@m.m Attention the .cat file provided in <projectname>\<projectname>_installation\redist\<projectname>.cat is test signed and should NOT be distributed. |
<KP driver name>.sys to your distribution package.wdapi, based on your target platform:| Platform | File Name | Distribution using WinDriver (No Renaming) | Distribution of a Renamed Driver |
|---|---|---|---|
| 32-bit binaries for x86 target platforms 64-bit binaries for x86_64 platforms | wdapi1630.dll | WinDriver\redist\wdapi1630.dlll | <projectname>\<projectname>_installation\redist\wdapi1630.dll |
| 32-bit binaries for x86_64 platforms | wdapi1630_32.dll | WinDriver\redist\wdapi1630_32.dll | <projectname>\<projectname>_installation\redist\wdapi1630_32.dll |
| 64-bit binaries for ARM64 platforms | wdapi1630_arm64.dll | WinDriver\redist\wdapi1630_arm64.dll | <projectname>\<projectname>_installation\redist\wdapi1630_arm64.dll |
The following subsections explain which language specific files to add to your distribution package.
Note: If your project is written in a language that is not specified in the following subsections, then there are no additional files you need to add to your distribution package.
| Platform | File Name | Distribution using WinDriver (No Renaming) | Distribution of a Renamed Driver |
|---|---|---|---|
| 32-bit binaries for x86 target platforms 64-bit binaries for x86_64 platforms | wdapi_dotnet1630.dll | WinDriver\lib\wdapi_dotnet1630.dll | <projectname>\<projectname>_installation\lib\wdapi_dotnet1630.dll |
| 32-bit binaries for x86_64 platforms | wdapi_dotnet1630_32.dll | WinDriver\lib\wdapi_dotnet1630_32.dll | <projectname>\<projectname>_installation\lib\wdapi_dotnet1630_32.dll |
| Platform | File Name | Distribution using WinDriver (No Renaming) | Distribution of a Renamed Driver |
|---|---|---|---|
| 32-bit binaries for x86 target platforms 64-bit binaries for x86_64 platforms | wdapi_netcore1630.dll | WinDriver\lib\wdapi_netcore1630.dll | <projectname>\<projectname>_installation\lib\wdapi_netcore1630.dll |
| 32-bit binaries for x86_64 platforms | wdapi_netcore1630_32.dll | WinDriver\lib\wdapi_netcore1630_32.dll | <projectname>\<projectname>_installation\lib\wdapi_netcore1630_32.dll |
| 64-bit binaries compiled on x64 platform for ARM64 platforms | arm64\wdapi_netcore1630.dll | WinDriver\lib\arm64\wdapi_netcore1630.dll | <projectname>\<projectname>_installation\lib\arm64\wdapi_netcore1630.dll |
| Platform | File Name | Distribution using WinDriver (No Renaming) | Distribution of a Renamed Driver |
|---|---|---|---|
| 32-bit binaries for x86 target platforms 64-bit binaries for x86_64 platforms | wdapi_java1630.dllwdapi_java1630.jar | WinDriver\lib\wdapi_java1630.dllWinDriver\lib\wdapi_java1630.jar | <projectname>\<projectname>_installation\lib\wdapi_java1630.dll<projectname>\<projectname>_installation\lib\wdapi_java1630.jar |
| 64-bit binaries compiled on x64 platform for ARM64 platforms | wdapi_java1630.dllwdapi_java1630.jar | WinDriver\lib\arm64\wdapi_java1630.dllWinDriver\lib\arm64\wdapi_java1630.jar | <projectname>\<projectname>_installation\lib\wdapi_java1630.dll<projectname>\<projectname>_installation\lib\wdapi_java1630.jar |
⚠ Attention
On Windows 10 or higher you must disable digital signature enforcement in order to install unsigned INF files generated by the DriverWizard, or enter test signing mode and create a WinDriver test certificate (using
wdreg) in order to install test signed INF files generated by the DriverWizard. See 17.3.4. Temporary disabling digital signature enforcement in Windows 10 and 17.3.5.3 How to Generate Test Signed INF Files in DriverWizard Code Generation?.Make sure that this was done prior to performing the following steps, otherwise they will not work.
If you are preparing a distribution package for a testing machine and you chose to enable test signed INF files in DriverWizard code generation, in addition to the files listed above, in order to install the test signed INF files, you must also add:
⚠ Attention
The following files are for development and testing use only and should NOT be distributed.
| File Name | Distribution using WinDriver (No Renaming) | Distribution of a Renamed Driver |
|---|---|---|
| .cer file of the certificate used to sign the INF | Copy the .cer file used to sign the cat file, the default .cer file is WinDriver\WinDriver1630.cer | <projectname>\<projectname>_installation\redist\<certificate_name>.cer |
| install_test_cert.bat uninstall_test_cert.bat | <projectname>\<projectname>_installation\redist\install_test_cert.bat<projectname>\<projectname>_installation\redist\uninstall_test_cert.bat | |
| .cat | .cat file for device INF can be generated in Generate .INF file dialog | <projectname>\<projectname>_installation\redist\<projectname>.catNote: The above catalog file contains a signature for both driver INF and device INF. |
For installing the test signed INF files on a testing machine, see Chapter 17.3.5.2.2 Steps for Installing Test Signed INF Files on a Testing Machine
⚠ Attention
All references to
wdregin the following section can be replaced withwdreg_gui, which offers the same functionality aswdregbut displays GUI messages instead of console-mode messages.
⚠ Attention
The
wdreg.exeutility, included in the x64 version of WinDriver is different than thewdreg.exeutility included in the ARM64 version of WinDriver. To run the x64 version ofwdreg.exeon an ARM64 platform, add the-compatflag to the cmmand.
⚠ Attention
wdreg.exe/wdreg_gui.execan be found in theWinDriver\utildirectory.
Driver installation on Windows requires administrator privileges.
Follow the instructions below in the specified order to properly install your driver on the target computer:
To successfully install your driver, make sure that there are no open handles to the WinDriver service (windrvr1630.sys or your renamed driver <projectname>.sys), and that there are no connected and enabled Plug-and-Play devices that are registered with this service. If the service is being used, attempts to install the new driver using wdreg will fail. This is relevant, for example, when upgrading from an earlier version of the driver that uses the same driver name. You can disable or uninstall connected devices from the Device Manager (Properties | Disable/Uninstall) or using wdreg, or otherwise physically disconnect the device(s) from the PC.
This includes closing any applications that may be using the driver, uninstalling your old Kernel PlugIn driver (if you had created such a driver) and either disabling, uninstalling, or physically disconnecting any device that is registered to work with the WinDriver service. The command to uninstall old kernel plugins is as follows:
⚠ Attention
Since version 11.9.0 of WinDriver, the default driver module name includes the WinDriver version, so if you do not rename the driver to a previously-used name there should not be any conflicts with older drivers.
When distributing your driver, you should attempt to ensure that the installation does not overwrite a newer version of windrvr1630.sys with an older version of the file in the Windows drivers directory (windir%\system32\drivers). You can do this by, for example, configuring your installation program (if you are using one) or your INF file so that the installer automatically compares the time stamp on these two files and does not overwrite a newer version with an older one.
The provided windrvr1630.inf file uses the COPYFLG_NO_VERSION_DIALOG directive, which is designed to avoid overwriting a file in the destination directory with the source file if the existing file is newer than the source file.
There is also a similar COPYFLG_OVERWRITE_OLDER_ONLY directive that is designed to ensure that the source file is copied to the destination directory only if the destination file is superseded by a newer version.
Note, however, that both of these INF directives are irrelevant to digitally signed drivers. As explained in the Microsoft INF CopyFiles Directive documentation — https://msdn.microsoft.com/en-us/library/ff546346%28v=vs.85%29.aspx — if a driver package is digitally signed, Windows installs the package as a whole and does not selectively omit files in the package based on other versions already present on the computer.
| File | Distribution using WinDriver (No Renaming) | Distribution of a Renamed Driver |
|---|---|---|
| .sys | WinDriver\redist\windrvr1630.sys | <projectname>\<projectname>_installation\redist\<projectname>.sys |
| .inf (driver) | WinDriver\redist\windrvr1630.inf | <projectname>\<projectname>_installation\redist\<projectname>_driver.inf |
| .cat (for driver INF) | WinDriver\redist\windrvr1630.cat | If the package is for distribution: You can create this file using Inf2Cat (provided with WDK). If the package is for testing: <projectname>\<projectname>_installation\redist\<projectname>.catAttention the .cat file provided in <projectname>\<projectname>_installation\redist\<projectname>.cat is test signed and should NOT be distributed. |
⚠ Attention
windrvr1630.catcontains the driver's Authenticode digital signature. To maintain the signature's validity this file must be found in the same installation directory as thewindrvr1630.inffile. If you select to distribute the catalog and INF files in different directories, or make any changes to these files or to any other files referred to by the catalog file (such aswindrvr1630.sys), you will need to do either of the following:
- Create a new catalog file and re-sign the driver using this file.
- Comment-out or remove the following line in the
windrvr1630.inffile:and not include the catalog file in your driver distribution. However, note that this option invalidates the driver's digital signature.CatalogFile=windrvr1630.cat
wdreg.exe to install WinDriver's kernel module on the target computer:For example, if windrvr1630.inf and windrvr1630.sys are in the d:\MyDevice directory on the target computer, the command should be:
You can find the executable of wdreg in the WinDriver package under the WinDriver\util directory.
⚠ Attention
wdregis an interactive utility. If it fails, it will display a message instructing the user how to overcome the problem. In some cases the user may be asked to reboot the computer.
Note: The windrvr1630.sys driver provided by Jungo is digitally signed.
windrvr1630.sys):Run the utility wdreg with the install command to automatically install the INF file and update the Windows Device Manager:
You can also use the wdreg utility's preinstall command to pre-install an INF file for a device that is not currently connected to the PC:
If the installation fails with an ERROR_FILE_NOT_FOUND error, inspect the Windows registry to see if the RunOnce key exists in HKEY_LOCAL_MACHINE\SOFTWARE\Microsoft\Windows\CurrentVersion. This registry key is required by Windows Plug-and-Play in order to properly install drivers using INF files. If the RunOnce key is missing, create it; then try installing the INF file again.
Driver installation on Windows requires administrator privileges.
If you have created a Kernel PlugIn driver, follow the additional instructions below:
<KP driver name>.sys) to Windows drivers directory on the target computer (%windir%\system32\drivers).wdreg.exe to add your Kernel PlugIn driver to the list of device drivers Windows loads on boot. Use the following installation command to install a SYS Kernel PlugIn Driver:You can find the executable of wdreg in the WinDriver package under the WinDriver\util directory.
⚠ Attention
The
wdreg.exeutility, included in the x64 version of WinDriver is different than thewdreg.exeutility included in the ARM64 version of WinDriver. To run the x64 version ofwdreg.exeon an ARM64 platform, add the-compatflag to the cmmand.
If your hardware-control application/DLL uses wdapi1630.dll (as is the case for the sample and generated DriverWizard WinDriver projects), copy this DLL to the target's shared library directory, according to the application/target platform as shown in the table:
| Platform | File from Distribution package (No Renaming) | Destination on Target |
|---|---|---|
| 32-bit applications/DLLs for x86 targets 64-bit applications/DLLs for x86_64 targets | wdapi1630.dll | %windir%\system32 |
| 32-bit applications/DLLs for x86_64 targets | wdapi1630_32.dll | %windir%\sysWOW64 |
| 64-bit applications/DLLs compiled on ARM64 or x64 platform for ARM64 targets | wdapi1630_arm64.dll | %windir%\system32 |
⚠ Attention
If you attempt to write a 32-bit installation program that installs a 64-bit program, and therefore copies the 64-bit
wdapi1630.dllDLL to the%windir%\system32directory, you may find that the file is actually copied to the 32-bit%windir%\sysWOW64directory. The reason for this is that Windows x64 platforms translate references to 64-bit directories from 32-bit commands into references to 32-bit directories. You can avoid the problem by using 64-bit commands to perform the necessary installation steps from your 32-bit installation program. Thesystem64.exeprogram, provided in theWinDriver\redistdirectory of the Windows x64 WinDriver distributions, enables you to do this.
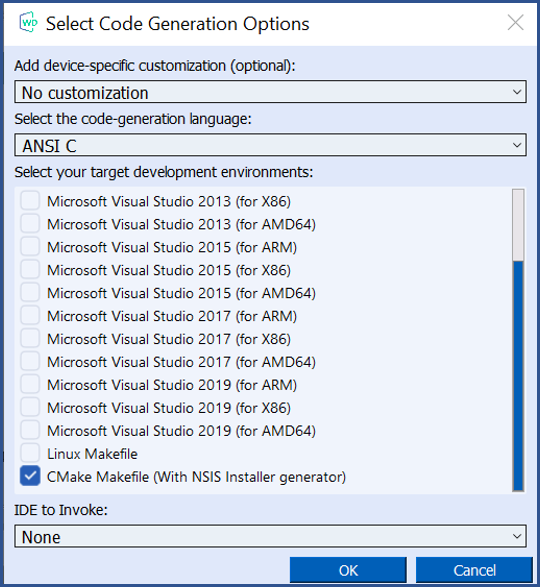
Starting from WinDriver version 14.3, WinDriver supports creation of NSIS installers for Windows for your generated code and user applications, via a CMake Project compiled on Visual Studio 2019. Currently this feature is supported only on Windows 64 bit applications without a Kernel PlugIn.
Note: For further debugging or troubleshooting of driver installation issues, refer to windir%/INF/setupapi.dev.log
What the Installer does:
wdreg utility.This allows to save users precious time in manually creating a redistribution package.
Make sure Visual Studio 2019 is installed along with the “C++ CMake Tools for Windows” and “Desktop development with C++” components installed.
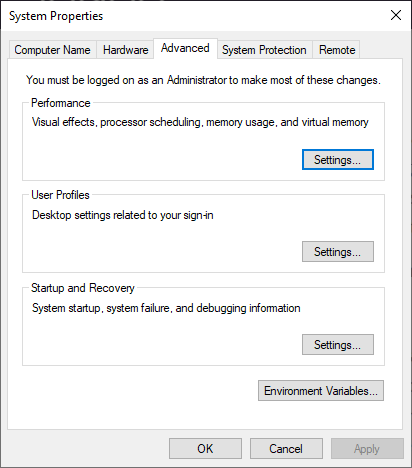
As the next step, please make sure NSIS is installed if you haven’t already installed it on your development machine. If it is not, you can download it from the NSIS website. Make sure that the PATH environment variable includes the path to makensis.exe. This can be done the following way:
Edit the system environment variables, this will open the System Properties Window.Path Variable and make sure it includes the path to MakeNSIS.exe (e.g. C:\Program Files\NSIS)Editing Environment Variables
Follow these steps:
WinDriver Code Generation Window
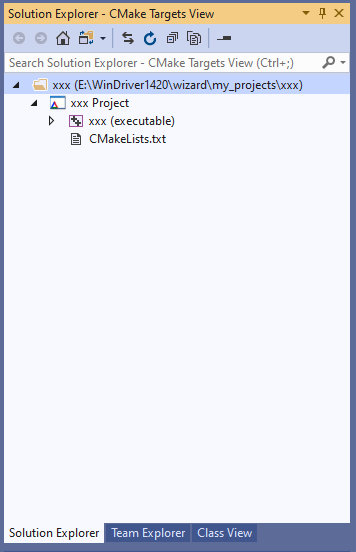
xxx will be the driver name in this tutorial) found in WinDriver\wizard\my_projects\xxx you should find a CMakeLists.txt file.WinDriver\wizard\my_projects\xxx\CMakeLists.txt.Changing to CMake Targets View

The CMake Targets View
xxx_lib.c such that XXX_DEFAULT_LICENSE_STRING will be defined to be your license string, and that XXX_DEFAULT_DRIVER_NAME will be defined to be your renamed driver name (in this case xxx). If you do not perform this step your user application might work on your development computer but will not work on the target computer.License String replacement in code

xxx.exe file of your generated code in WinDriver\wizard\my_projects\xxx\out\build\(PLATFORM_NAME)\WIN32 and an additional installer EXE file xxx_1.0.0-win64.exe WinDriver\wizard\my_projects\xxx\out\build\(PLATFORM_NAME). CMakeLists.txt file to better suit for your needs.⚠ Attention
Before installing the driver on a Windows-based target machine, either digitally sign the driver or disable Digital Signature enforcement. In addition, make sure to run the installer EXE as Administrator to make sure it has privileges to install drivers. Failure to do so might result in the driver not being installed properly on the target machine.
To distribute your driver, prepare a distribution package containing the required files and then build and install the required driver components on the target.
If you have renamed the WinDriver driver module, replace references to windrvr1630 in the following instructions with the name of your renamed driver module.
It is recommended that you supply an installation shell script to automate the build and installation processes on the target.
Prepare a distribution package containing the required files, as described in this section.
If you wish to distribute drivers for both 32-bit and 64-bit target platforms, you must prepare separate distribution packages for each platform. The required files for each package are provided in the WinDriver installation directory for the respective platform.
In the following instructions, <source_dir> represents the source directory from which to copy the distribution files. The default source directory is your WinDriver installation directory. However, if you have renamed the WinDriver driver name, the source directory is a directory containing modified files for compiling and installing the renamed drivers. When using DriverWizard to generate the driver code, the source directory for the renamed driver is the generated xxx_installation directory, where xxx is the name of your generated driver project.
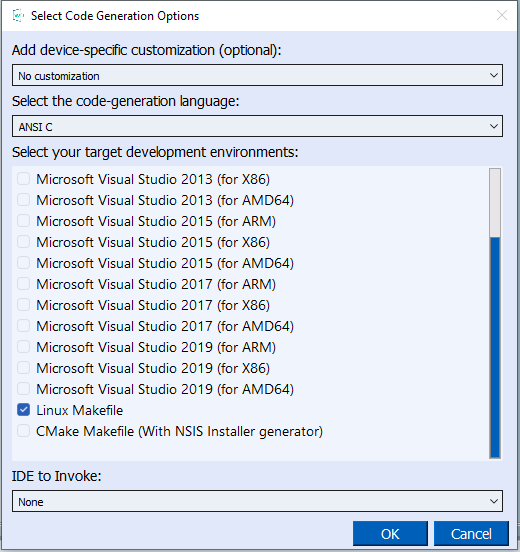
Another thing to notice is the target development environment. If you wish to generate a Linux Makefile (not a CMake package), choose Linux Makefile from the list:
Your WinDriver-based driver relies on the windrvr1630.o/.ko kernel driver module, which implements the WinDriver API — windrvr1630.o/.ko. In addition, if you have created a Kernel PlugIn driver, the functionality of this driver is implemented in a kp_xxx_module.o/.ko kernel driver module (where xxx is your selected driver project name).
Your kernel driver modules cannot be distributed as-is; they must be recompiled on each target machine, to match the kernel version on the target. This is due to the following reason: the Linux kernel is continuously under development, and kernel data structures are subject to frequent changes. To support such a dynamic development environment, and still have kernel stability, the Linux kernel developers decided that kernel modules must be compiled with header files identical to those with which the kernel itself was compiled. They enforce this by including a version number in the kernel header files, which is checked against the version number encoded into the kernel. This forces Linux driver developers to support recompilation of their driver with the target system's kernel version.
Following is a list of the components you need to distribute to enable compilation of your kernel driver modules on the target machine.
It is recommended that you copy the files to subdirectories in the distribution directory that match the source subdirectories, such as redist and include, except where otherwise specified. If you select not do so, you will need to modify the file paths in the configuration scripts and related makefile templates, to match the location of the files in your distribution directory.
<source_dir>/include directory, copy windrvr.h, wd_ver.h, and windrvr_usb.h — header files required for building the kernel modules on the target.Note that windrvr_usb.h is required also for non-USB drivers.
<WinDriver installation directory>/util directory (or from the generated DriverWizard xxx_installation/redist directory), copy wdreg — a script for loading the WinDriver kernel driver module — to the redist distribution directory.<source_dir>/redist directory, unless where otherwise specified, copy the following files:setup_inst_dir — a script for installing the WinDriver driver module, using wdreg (see above).linux_wrappers.c/.h — wrapper library source code files that bind the kernel module to the Linux kernel.linux_common.h and wdusb_interface.h — header files required for building the kernel modules on the target.wdusb_linux.c — source file used by WinDriver to utilize the USB stack (for USB drivers).Note that wdusb_interface.h is required also for non-USB drivers.
The compiled object code for building the WinDriver kernel driver module:
windrvr_gcc_v3.o_shipped — for GCC v3.x.x compilation (also have been tested to work with GCC up to version 8, for 64-bit versions of Linux)windrvr_gcc_v3_regparm.o_shipped — for GCC v3.x.x compilation (for 32-bit versions of Linux)Configuration scripts and makefile templates for creating makefiles for building and installing the WinDriver kernel driver module.
Files that include .kbuild in their names use kbuild for the driver compilation.
configure — a configuration script that uses the makefile.in template to create a makefile for building and installing the WinDriver driver module, and executes the configure.wd script (see below).configure.wd — a configuration script that uses the makefile.wd[.kbuild].in template to create a makefile.wd[.kbuild] makefile for building the windrvr1630.o/.ko driver module.configure.usb — a configuration script that uses the makefile.usb[.kbuild].in template to create a makefile.usb[.kbuild] makefile for building the windrvr1630_usb.o/.ko drive rmodule (for USB drivers).makefile.in — a template for the main makefile for building and installing the WinDriver kernel driver module, using makefile.wd[.kbuild] ( and makefile.usb[.kbuild]).makefile.wd.in and makefile.wd.kdbuild.in — templates for creating makefile.wd[.kbuild] makefiles for building and installing the windrvr1630.o/.ko driver module.makefile.usb.in and makefile.usb.kdbuild.in — templates for creating makefile.usb[.kbuild] makefiles for building and installing the windrvr1630_usb.o/.ko driver module.If you have created a Kernel PlugIn driver — copy the following files as well:
xxx_installation/redist directory (where xxx is the name of your driver project), copy the following configuration script and makefile templates, for creating a makefile for building and installing the Kernel PlugIn driver.If you did not generate your Kernel PlugIn driver using the DriverWizard, copy the files from your Kernel PlugIn project; the files for the KP_PCI sample, for example, are found in the WinDriver/samples/c/pci_diag/kp_pci directory.
Note: before copying the files, rename them to add a ".kp" indication — as in the xxx_installation/redist file names listed below — in order to distinguish them from the WinDriver driver module files. You will also need to edit the file names and paths in the files, to match the structure of the distribution directory.
configure.kp — a configuration script that uses the makefile.kp[.kbuild].in template (see below) to create a makefile.kp makefile for building and installing the Kernel PlugIn driver module.⚠ Attention
If you have renamed the WinDriver kernel module, be sure to uncomment the following line in your Kernel PlugIn configuration script (by removing the pound sign — "#"), before executing the script, in order to build the driver with the
-DWD_DRIVER_NAME_CHANGEflag:# ADDITIONAL_FLAGS="-DWD_DRIVER_NAME_CHANGE"
From the <source_dir>/lib directory, copy the compiled WinDriver-API object code:
kp_wdapi1630_gcc_v3.o_shipped — for GCC v3.x.x compilation (also been tested to work with GCC up to version 5.4.0).kp_wdapi1630_gcc_v3_regparm.o_shipped — for GCC v3.x.x compilation with the regparm flag.From the kermode/linux/LINUX.<kernel version>.<CPU> directory that is created when building the Kernel PlugIn driver on the development machine, copy to the lib distribution subdirectory the compiled object code for building your Kernel PlugIn driver module (where xxx is the name of your Kernel PlugIn driver project):
kp_xxx_gcc_v3.o_shipped — for GCC v3.x.x compilation (also have been tested to work on GCC versions up to 8, for 64-bit versions of Linux).kp_xxx_gcc_v3_regparm.o_shipped — for GCC v3.x.x compilation (for 32-bit versions of Linux).Copy the user-mode hardware-control application or shared object that you created with WinDriver, to the distribution package.
If your hardware-control application/shared object uses libwdapi1630.so — as is the case for the WinDriver samples and generated DriverWizard projects — copy this file from the <source_dir>/lib directory to your distribution package.
If you are distributing a 32-bit application/shared object to a target 64-bit platform — copy libwdapi1630_32.so from the WinDriver/lib directory to your distribution package, and rename the copy to libwdapi1630.so.
If your user application is a Java application/shared object you must also add libwdapi_java1630.so (for distribution of 32-bit binaries to 32-bit target platforms or for distribution of 64-bit binaries to 64-bit platforms). You should also add wdapi_java1630.jar to your package. Get those files from the WinDriver\lib directory of the WinDriver package (specifically from its subdirectory relevant to your platform).
Since your hardware-control application/shared object does not have to be matched against the Linux kernel version number, you may distribute it as a binary object (to protect your code from unauthorized copying). If you select to distribute your driver's source code, note that under the license agreement with Jungo you may not distribute the source code of the libwdapi1630.so shared object, or the WinDriver license string used in your code.
From the distribution package subdirectory containing the configure script and related build and installation files — normally the redist subdirectory — perform the following steps to build and install the driver module on the target:
The configuration script creates a makefile based on the running kernel. You may select to use another installed kernel source, by executing the script with the --with-kernel-source=<path> option, where <path>is the full path to the kernel source directory — e.g., /usr/src/linux.
If the Linux kernel version is 2.6.26 or higher, the configuration script generates makefiles that use kbuild to compile the kernel modules. You can force the use of kbuild on earlier versions of Linux, by executing the configuration script with the --enable-kbuild flag.
⚠ Attention
For a full list of the configuration script options, use the –help option:
./configure --help.
This will create a LINUX.<kernel version>.<CPU> directory, containing the newly compiled driver module — windrvr1630.o/.ko.
windrvr1630.o/.ko driver module.The following command must be executed with root privileges.
The installation is performed using the setup_inst_dir script, which copies the driver module to the target's loadable kernel modules directory, and uses the wdreg script to load the driver module.
/dev/windrvr1630, depending on how you wish to allow users to access hardware through the device.Due to security reasons, by default the device file is created with permissions only for the root user. Change the permissions by modifying your /etc/udev/permissions.d/50-udev.permissions file. For example, add the following line to provide read and write permissions:
Use the wdreg script to dynamically load the WinDriver driver module on the target after each boot. To automate this, copy wdreg to the target machine, and add the following line to the target's Linux boot file (for example, /etc/rc.local):
If you have created a Kernel PlugIn driver [11], build and install this driver — kp_xxx_module.o/.ko — on the target, by performing the following steps from the distribution package subdirectory containing the configure.kp script and related build and installation files — normally the redist subdirectory.
makefile.kp:The configuration script creates a makefile based on the running kernel. You may select to use another installed kernel source, by executing the script with the --with-kernel-source=<path> option, where <path>is the full path to the kernel source directory — e.g., /usr/src/linux.
If the Linux kernel version is 2.6.26 or higher, the configuration script generates makefiles that use kbuild to compile the kernel modules. You can force the use of kbuild on earlier versions of Linux, by executing the configuration script with the --enable-kbuild flag.
⚠ Attention
For a full list of the configuration script options, use the –help option:
./configure --help.
This will create a LINUX.<kernel version>.<CPU>.KP directory, containing the newly compiled driver module — kp_xxx_module.o/.ko.
The following command must be executed with root privileges.
To automatically load your Kernel PlugIn driver on each boot, add the following line to the target's Linux boot file (for example, /etc/rc.local), after the WinDriver driver module load command (replace <path to kp_xxx_module.o/.ko> with the path to your Kernel PlugIn driver module, which is found in your LINUX.<kernel version>.<CPU>.KP distribution directory):
If your user-mode hardware-control application or shared object uses libwdapi1630.so (and libwdapi_java1630.so if it is a Java application), copy it (them) from the distribution package to the target's library directory:
/usr/lib — when distributing a 32-bit application/shared object to a 32-bit or 64-bit target./usr/lib64 — when distributing a 64-bit application/shared object to a 64-bit target.If you decided to distribute the source code of the application/shared object, copy the source code to the target as well.
⚠ Attention
Remember that you may not distribute the source code of the
libwdapi1630.soshared object or your WinDriver license string as part of the source code distribution.
Starting from WinDriver version 14.6, WinDriver supports creation of self extracting installers for Linux for your generated code and user applications, via a CMake Project.
What the Installer does:
configure and make install.This allows to save users precious time in manually creating a redistribution package.
Please make sure CMake version 3.17 or higher is installed on the development computer.
Please follow these steps:
WinDriver Code Generation Window
xxx will be the driver name in this tutorial) found in WinDriver\wizard\my_projects\xxx you should find a CMakeLists.txt file.xxx_lib.c such that XXX_DEFAULT_LICENSE_STRING will be defined to be your license string, and that XXX_DEFAULT_DRIVER_NAME will be defined to be your renamed driver name (in this case xxx). If you do not perform this step your user application might work on your development computer but will not work on the target computer.You should find in your user application binary WinDriver\wizard\my_projects\xxx\build and an additional installer SH file xxx_1.0.0-Linux.sh in WinDriver\wizard\my_projects\xxx\build.
Jungo recommends using the installer SH file for distributing your driver package.
CMakeLists.txt file to better suit for your needs.