|
Jungo WinDriver
Official Documentation
|
|
Jungo WinDriver
Official Documentation
|
Device information (INF) files are text files that provide information used by the Windows Plug-and-Play mechanism to install software that supports a given hardware device. INF files are required for hardware that identifies itself, such as USB and PCI. An INF file includes all necessary information about a device and the files to be installed. When hardware manufacturers introduce new products, they must create INF files to explicitly define the resources and files required for each class of device.
In some cases, the INF file for your specific device is supplied by the operating system. In other cases, you will need to create an INF file for your device. WinDriver's DriverWizard can generate a specific INF file for your device. The INF file is used to notify the operating system that WinDriver now handles the selected device.
For USB devices, you will not be able to access the device with WinDriver (either from DriverWizard or from the code) without first registering the device to work with windrvr1630.sys. This is done by installing an INF file for the device. DriverWizard will offer to automatically generate the INF file for your device.
You can use DriverWizard to generate the INF file on the development machine and then install the INF file on any machine to which you distribute the driver, as explained in the following sections.
We recommend creating an INF file for the following reasons:
You must have administrative privileges in order to install an INF file.
You can use the wdreg utility with the install command to automatically install the INF file:
On the development PC, you can have the INF file automatically installed when selecting to generate the INF file with DriverWizard, by checking the Automatically Install the INF file option in the DriverWizard's INF generation window (refer to 6.2. DriverWizard Walkthrough).
On the development PC, you can also use the wdreg_frontned utility to install/uninstall INFs and perform other advanced tasks.
It is also possible to install the INF file manually, using either of the following methods:
In all the manual installation methods above you will need to point Windows to the location of the relevant INF file during the installation.
We recommend using the wdreg utility to install the INF file automatically, instead of installing it manually.
If the installation fails with an ERROR_FILE_NOT_FOUND error, inspect the Windows registry to see if the RunOnce key exists in HKEY_LOCAL_MACHINE\SOFTWARE\Microsoft\Windows\CurrentVersion. This registry key is required by Windows Plug-and-Play in order to properly install drivers using INF files. If the RunOnce key is missing, create it; then try installing the INF file again.
You must have administrative privileges in order to replace a driver.
You can use the wdreg utility with the install command to automatically install the INF file:
On the development PC, you can have the INF file automatically installed when selecting to generate the INF file with DriverWizard, by checking the Automatically Install the INF file option in the DriverWizard's INF generation window. On the development PC, you can also use the wdreg_frontned utility to install/uninstall INFs and perform other advanced tasks.
It is also possible to install the INF file manually, using either of the following methods:
In the manual installation methods above you will need to point Windows to the location of the relevant INF file during the installation. If the installation wizard offers to install an INF file other than the one you have generated, select Install one of the other drivers and choose your specific INF file from the list.
We recommend using the wdreg utility to install the INF file automatically, instead of installing it manually.
If the installation fails with an ERROR_FILE_NOT_FOUND error, inspect the Windows registry to see if the RunOnce key exists in HKEY_LOCAL_MACHINE\SOFTWARE\Microsoft\Windows\CurrentVersion. This registry key is required by Windows Plug-and-Play in order to properly install drivers using INF files. If the RunOnce key is missing, create it; then try installing the INF file again.
The WinDriver APIs are implemented within the WinDriver kernel driver module (windrvr1630.sys/.dll/.ko — depending on the OS), which provides the main driver functionality and enables you to code your specific driver logic from the user mode.
On Windows and Linux you can change the name of the WinDriver kernel module to your preferred driver name, and then distribute the renamed driver instead of the default kernel module — windrvr1630.sys/.dll/.ko. The following sections explain how to rename the driver for each of the supported operating systems.
For information on how to use the Debug Monitor to log debug messages from your renamed driver, refer to 8.2.1.3. Running wddebug_gui for a Renamed Driver : Running wddebug_gui for a Renamed Driver.
A renamed WinDriver kernel driver can be installed on the same machine as the original kernel module. You can also install multiple renamed WinDriver drivers on the same machine, simultaneously.
💡 Recommendation
Try to give your driver a unique name in order to avoid a potential conflict with other drivers on the target machine on which your driver will be installed.
DriverWizard automates most of the work of renaming the Windows WinDriver kernel driver — windrvr1630.sys.
When renaming the driver, the CPU architecture (32-/64-bit) of the development platform and its WinDriver installation, should match the target platform.
Renaming the signed windrvr1630.sys driver nullifies its signature. In such cases you can select either to sign your new driver, or to distribute an unsigned driver. For more information on driver signing and certification, refer to 17.3. Windows Digital Driver Signing and Certification. For guidelines for signing and certifying your renamed driver, refer to 17.3.2. Driver Signing and Certification of WinDriver-Based Drivers.
⚠ Attention
References to xxx in this section should be replaced with the name of your generated DriverWizard driver project.
To rename your Windows WinDriver kernel driver, follow these steps:
xxx) as the name of the generated driver project. The generated project directory (xxx) will include an xxx_installation directory with the following files and directories:redist directory: | File | Description |
|---|---|
xxx.sys | Your new driver, which is actually a renamed copy of the windrvr1630.sys driver. The properties of the generated driver file (such as the file's version, company name, etc.) are identical to the properties of the original windrvr1630.sys driver. You can rebuild the driver with new properties using the files from the generated xxx_installation\sys directory, as explained below. |
xxx_driver.inf | A modified version of the windrvr1630.inf file, which will be used to install your new xxx.sys driver. You can make additional modifications to this file, if you wish — namely, changing the string definitions and/or comments in the file. |
xxx_device.inf | A modified version of the standard generated DriverWizard INF file for your device, which registers your device with your driver (xxx.sys).You can make additional modifications to this file, if you wish, such as changing the manufacturer or driver provider strings. |
wdapi1630.dll | A copy of the WinDriver-API DLL. The DLL is copied here in order to simplify the driver distribution, allowing you to use the generated xxx\redist directory as the main installation directory for your driver, instead of the original WinDriver\redist directory. |
wdreg.exe, wdreg_gui.exe, and devcon.exe | Copies of the CUI and GUI versions of the wdreg WinDriver driver installation utility, and the Device Console app required by this utility, (respectively). These files are copied from the WinDriver\util directory, to simplify the installation of the renamed driver. |
xxx_install.bat | An installation script that executes the wdreg commands for installing the xxx_driver.inf and xxx_device.inf files. This script is designed to simplify the installation of the renamed xxx_driver.sys driver, and the registration of your device with this driver. |
sys directory: xxx.sys driver file:xxx.rc resources file in the generated sys directory in order to set different driver file properties.xxx.vcxproj with MsBuild or Visual Studio.xxx.sys driver, copy the new driver file to the generated xxx_installation\redist directory.windrvr1630), so all you need to do is replace the driver name that is passed to the function in the code with your new driver name.WD_DRIVER_NAME_CHANGE preprocessor flag (e.g., -DWD_DRIVER_NAME_CHANGE). Note: The sample and generated DriverWizard WinDriver kernel projects/makefiles already set this preprocessor flag by default.xxx_installation directory instead of the installation files from the original WinDriver distribution. Note that you can use the generated xxx_install.bat installation script to simplify the installation.WinDriver for Windows allows building your driver with custom version information (Provider, Date, Version, etc…). This information can be seen upon entering the Device Properties of your device in the Device Manager or by right-clicking the driver binary and selecting the “Details” tab.
Visual Studio is required in order to perform the following procedure. In the following instructions xxx stands for your generated driver name.
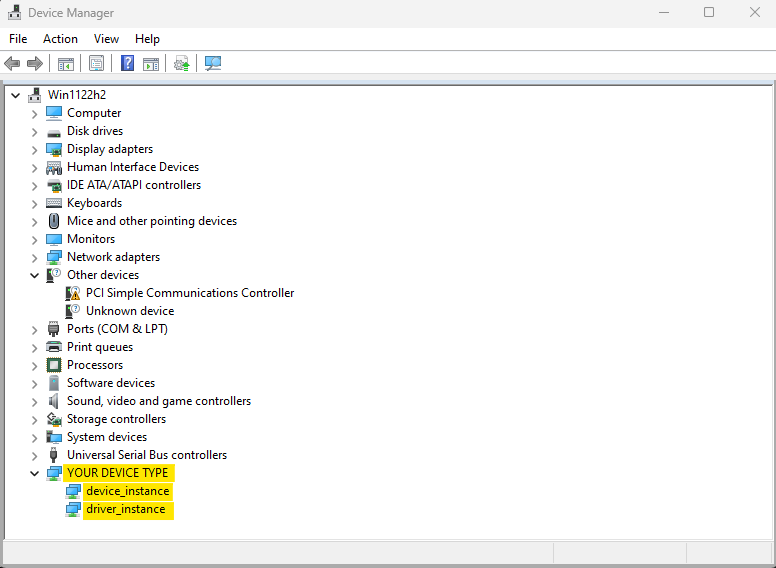
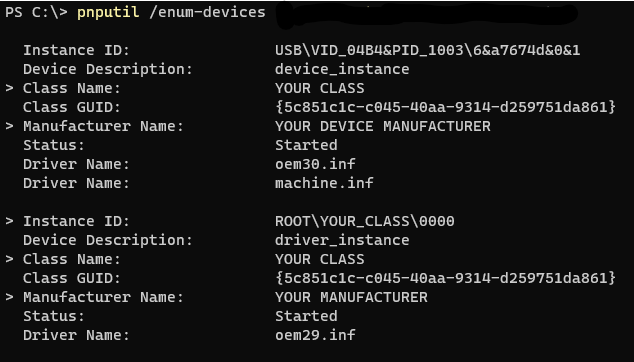
xxx_installation\sys subfolder.xxx.rc and modify the details in it to suit your needs.xxx.vcxproj with Visual Studio and build the project. Make sure you compile the driver in Release configuration for your platform (32 or 64 bits).xxx.sys file should include your custom version information.In order to change the details of your driver as they appear in the Device Manager and pnputil utility, several lines in the driver's device and driver .inf files must be edited. Each change affects a different field, as can be seen in the table below:
| Line | File | Affected Fields | Device / Driver Instance |
|---|---|---|---|
Class="YOUR CLASS" ClassGuid=<Your GUID> | xxx_device.inf xxx_driver.inf | * Device Manager>Properties>Details>Property>Class * Device Manager>Properties>Details>Property>Class Description * pnputil /enum-devices -> Class Name | Both |
jun="YOUR DEVICE PROVIDER" | xxx_device.inf | * Device Manager>Properties>Driver>Driver Provider * Device Manager>Properties>Details>Property>Provider | Device |
Mfg="YOUR DEVICE MANUFACTURER" | xxx_device.inf | * Device Manager>Properties>General>Manufacturer * Device Manager>Properties>Details>Property>Manufacturer * pnputil /enum-devices -> Manufacturer Name (device instance only) | Device |
HKR,,,,"YOUR DEVICE TYPE" | xxx_driver.inf | * Driver subfolder in the Device Manager * Device Manager>Properties>General>Device Type * Device Manager>Properties>Details>Property>Class Name * Device Manager>Properties>Details>Property>Display Name | Both |
MFGNAME="YOUR MANUFACTURER" | xxx_driver.inf | * Device Manager>Properties>Driver>Driver Provider * Device Manager>Properties>General>Manufacturer * Device Manager>Properties>Details>Property>Provider * Device Manager>Properties>Details>Property>Manufacturer * pnputil /enum-devices -> Manufacturer Name (driver instance only) | Driver |
⚠ Attention
A unique GUID must be generated for the field
ClassGuid. This GUID can be generated in https://www.guidgenerator.com/ or similar sites.
Device and Driver Instances in the Subfolder in Device Manager
Device and Driver Instance Details in Pnputil
DriverWizard automates most of the work of renaming the Linux WinDriver kernel driver — windrvr1630.ko.
⚠ Attention
References to xxx in this section should be replaced with the name of your generated DriverWizard driver project.
To rename your Linux WinDriver kernel driver, follow these steps:
xxx_installation directory with the following files and directories:redist directory: This directory contains copies of the files from the original WinDriver/redist installation directory, but with the required modifications for building your xxx.ko driver instead of windrvr1630.ko. lib and include directories: Copies of the library and include directories from the original WinDriver distribution. These copies are created since the supported Linux WinDriver kernel driver build method relies on the existence of these directories directly under the same parent directory as the redist directory.
windrvr1630), so all you need to do is replace the driver name that is passed to the function in the code with your new driver name.WD_DRIVER_NAME_CHANGE preprocessor flag (-DWD_DRIVER_NAME_CHANGE). Note that the sample and generated DriverWizard WinDriver kernel projects/makefiles already set this preprocessor flag by default. If you have created a Kernel PlugIn driver, you will need to add this flag by uncommenting the following line in the Kernel PlugIn driver's configuration script:As part of the installation, build your new kernel driver module(s) by following the instructions in
15.3. Linux Driver Distribution, using the files from your new installation directory.
Before distributing your driver, you may digitally sign it using Microsoft's Authenticode mechanism, and/or certify it by submitting it to Microsoft's Windows Certification Program (HLK/HCK/WLP).
Some Windows operating systems, do not require installed drivers to be digitally signed or certified. Only a popup with a warning will appear. There are, however, advantages to getting your driver digitally signed or fully certified, including the following:
64-bit versions of Windows 8 and higher require Kernel-Mode Code Signing (KMCS) of software that loads in kernel mode. This has the following implications for WinDriver-based drivers:
For more information about digital driver signing and certification, refer to the following documentation in the Microsoft Development Network (MSDN) library:
This white paper contains information about kernel-mode code signing, test signing, and disabling signature enforcement during development.
Some of the documentation may still use old terminology. For example, references to the Windows Logo Program (WLP) or to the Windows Hardware Quality Labs (WHQL) or to the Windows Certification Program or to the Windows Hardware Certification Kit (HCK) should be replaced with the Windows Hardware Lab Kit (HLK), and references to the Windows Quality Online Services (Winqual) should be replaced with the Windows Dev Center Hardware Dashboard Services (the Hardware Dashboard).
The Microsoft Authenticode mechanism verifies the authenticity of a driver's provider. It allows driver developers to include information about themselves and their code with their programs through the use of digital signatures, and informs users of the driver that the driver's publisher is participating in an infrastructure of trusted entities.
The Authenticode signature does not, however, guarantee the code's safety or functionality.
The WinDriver\redist\windrvr1630.sys driver has an Authenticode digital signature.
Microsoft's Windows Certification Program (previously known as the Windows Logo Program (WLP)), lays out procedures for submitting hardware and software modules, including drivers, for Microsoft quality assurance tests. Passing the tests qualifies the hardware/software for Microsoft certification, which verifies both the driver provider's authenticity and the driver's safety and functionality.
To digitally sign and certify a device driver, a Windows Hardware Lab Kit (HLK) package, which includes the driver and the related hardware, should be submitted to the Windows Certification Program for testing, using the Windows Dev Center Hardware Dashboard Services (the Hardware Dashboard).
Jungo's professional services unit provides a complete Windows driver certification service for Jungo-based drivers. Professional engineers efficiently perform all the tests required by the Windows Certification Program, relieving customers of the expense and stress of in-house testing. Jungo prepares an HLK / HCK submission package containing the test results, and delivers the package to the customer, ready for submission to Microsoft.
For more information, refer to https://www.jungo.com/st/services/windows_drivers_certification/.
For detailed information regarding Microsoft's Windows Certification Program and the certification process, refer to the MSDN Windows Hardware Certification page — https://msdn.microsoft.com/library/windows/hardware/gg463010.aspx — and to the documentation referenced from that page, including the MSDN Windows Dev Center — Hardware Dashboard Services page — https://msdn.microsoft.com/library/windows/hardware/gg463091.
As indicated above, The WinDriver\redist\windrvr1630.sys driver has an embedded Authenticode signature. Since WinDriver's kernel module (windrvr1630.sys) is a generic driver, which can be used as a driver for different types of hardware devices, it cannot be submitted to Microsoft's Windows Certification Program as a standalone driver. However, once you have used WinDriver to develop a Windows driver for your selected hardware, you can submit both the hardware and driver for Microsoft certification, as explained below.
The driver certification and signature procedures — either via Authenticode or the Windows Certification Program — require the creation of a catalog file for the driver. This file is a sort of hash, which describes other files. The signed windrvr1630.sys driver is provided with a matching catalog file — WinDriver\redist\windrvr1630.cat. This file is assigned to the CatalogFile entry in the windrvr1630.inf file (provided as well in the redist directory). This entry is used to inform Windows of the driver's signature and the relevant catalog file during the driver's installation.
When the name, contents, or even the date of the files described in a driver's catalog file is modified, the catalog file, and consequently the driver signature associated with it, become invalid. Therefore, if you select to rename the windrvr1630.sys driver (17.2. Renaming the WinDriver Kernel Driver) and/or the related windrvr1630.inf file, the windrvr1630.cat catalog file and the related driver signature will become invalid.
In addition, when using WinDriver to develop a driver for your Plug-and-Play device, you normally also create a device-specific INF file that registers your device to work with the windrvr1630.sys driver module (or a renamed version of this driver). Since this INF file is created at your site, for your specific hardware, it is not referenced from the windrvr1630.cat catalog file and cannot be signed by Jungo a priori.
When renaming windrvr1630.sys and/or creating a device-specific INF file for your device, you have two alternative options regarding your driver's digital signing:
windrvr1630.cat file from the windrvr1630.inf file (or your renamed version of this file).Note that while renaming WinDriver\redist\windrvr1630.sys nullifies the driver's digital signature, the driver is still compliant with the certification requirements of the Windows Certification Program.
To digitally sign/certify your driver, follow these steps:
windrvr1630.sys (or your renamed driver) and any INF files used in your driver's installation.windrvr1630.inf file to refer to your new catalog file, and add a similar entry in your device-specific INF file; or incorporate both windrvr1630.inf and your device INF file into a single INF file that contains such a CatalogFile entry).Many WinDriver customers have already successfully digitally signed and certified their WinDriver-based drivers.
As indicated in Microsoft's documentation, before submitting the driver for testing and certification you need to download the Windows Hardware Certification Kit (HCK) (for Windows 8) or the Windows Hardware Lab Kit (HLK) (for Windows 10), and run the relevant tests for your hardware/software. After you have verified that you can successfully pass the HCK/HLK tests, create the required logs package and proceed according to Microsoft's documentation.
For more information, refer to the MSDN Windows Hardware Certification Kit (HCK) page — https://msdn.microsoft.com/library/windows/hardware/hh833788.
Secure boot is a security standard developed by Microsoft to help make sure that a PC boots using only software that is trusted by the Original Equipment Manufacturer (OEM). When the PC starts, the firmware checks the signature of each piece of boot software (UEFI, EFI apps, etc.) and blocks the loading of unsigned drivers.
⚠ Attention
Disabling Secure Boot and Digital signature enforcement is recommended during driver development and testing. However, a signed driver (Attestation Signing or HLK/WHQL) is required in order to install the driver after it has been distributed.
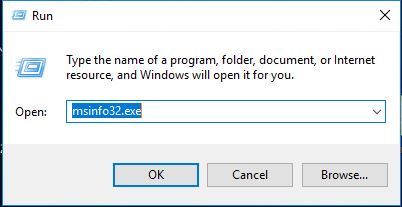
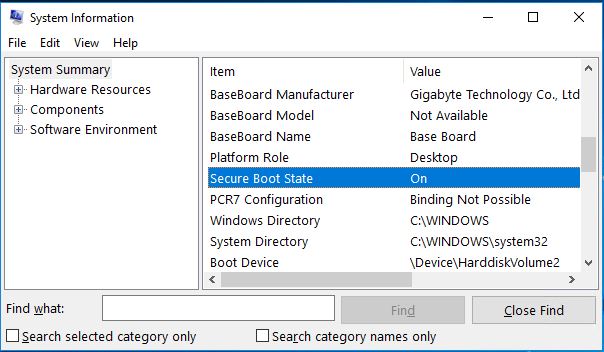
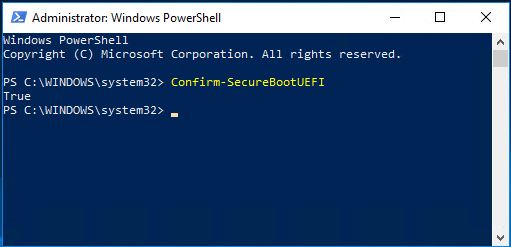
You can check if Secure Boot is enabled on your system by following one of the procedures below:
Run window
System Information
Confirm-SecureBootUEFI and press Enter.PowerShell
Starting from WinDriver 12.8 the user-mode API (e.g. wdapi1280.dll)
includes the function check_secureBoot_enabled() that can be used as follows:
In order to install and load unsigned drivers Secure Boot must be disabled.
Secure Boot can be disabled as follows:
For more information on Secure Boot setting, please see Microsoft Documentation.
Windows 10 (and other Windows versions) requires kernel drivers to be digitally signed. The WinDriver virtual device, which is installed during WinDriver installation process, is digitally signed. However, INF files that are generated by the DriverWizard utility are not signed and therefore will fail to install on Windows 10. In order to install them, it is required to digitally sign them. To bypass this requirement, it is possible to temporarily disable digital driver signing enforcement and install your INF file while the enforcement is disabled.
You can do this by following the procedure below:
This operation mode (Disabled Digital Signature Enforcement), which allows you to freely install INF files generated by WinDriver, will last until the next reboot. Your newly installed INF files should work properly even after the Digital Signature Enforcement will automatically be switched on again in the next reboot. Other ways are available to permanently disable Digital Signature Enforcement, and are dependent on your Windows version. Full explanation for these ways can be found online.
ℹ️ Note
Jungo provides Digital Signature Services for drivers developed with WinDriver. In order to find ore information, please send us an e-mail to sales.nosp@m.@jun.nosp@m.go.co.nosp@m.m.
Another way to avoid having to restart the computer constantly due to Windows' digital signature enforcement policy is to test sign your driver and enable test signing mode. This solution should be used for development and testing purposes only.
To test sign a driver you need a test certificate installed on your development machine (a test certificate is a self-signed certificate).
If you choose to create a test certificate in the WinDriver installer (See Chapter 3.2.1.1. Setting up Test Signing), then, when you use DriverWizard code generation, DriverWizard will automatically generate a digitally-test-signed catalog file for your driver package (a digitally-signed catalog file is used as a digital signature for an arbitrary collection of files). In that case, if you enable test-signing mode, you will be able to load the test signed driver without any prompts or warnings from Windows.
⚠ Attention
Test signed drivers should be used for development and testing purposes only, and should NOT be distributed to customers.
WinDriver provides an option for enabling and disabling test signing mode and for creating or removing the WinDriver test certificate. This option appears in two separate utilities: wdreg and wdreg_gui.
Both utilities can be found in the WinDriver\util directory; they can be run from the command line, and provide the same functionality. The difference is that wdreg_gui displays installation messages graphically, while wdreg displays them in console mode.
This section describes the use of wdreg / wdreg_gui on Windows operating systems.
The explanations and examples below refer to wdreg, but any references to wdreg can be replaced with wdreg_gui.
This section explains how to use the wdreg utility to enable or disable test signing mode on Windows.
Usage:
ACTIONS
wdreg supports several basic ACTIONS:
| Action | Description |
|---|---|
on | Enables test signing mode. This mode enables test signed drivers to load. |
off | Disables test signing mode. |
⚠ Attention
After changing the
testsigningboot configuration, a reboot is required for the changes to take effect. Once these changes take effect, you are not required to do anything else with Windows security settings during the development process (as opposed to disabling digital signature enforcement, which must be done after every reboot).
⚠ Attention
You must have administrative rights and disable Secure Boot to change the
testsigningboot configuration.
You can verify the value of the testsigning boot configuration by running:
The output look as follows:
This section explains how to use the wdreg utility to create or remove test certificates on Windows.
Usage:
ACTIONS
wdreg supports several basic ACTIONS:
| Action | Description |
|---|---|
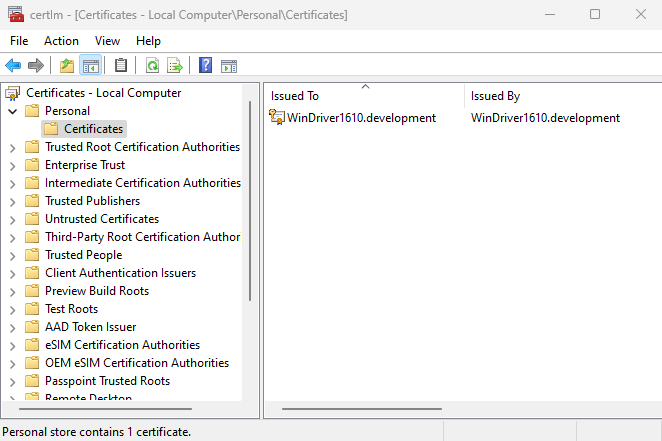
create | Creates a WinDriver test certificate and installs it in 3 local machine stores: 'Personal', 'Trusted Root Certification Authorities' and 'Trusted Publishers'. filepath should be the desired path of the created certificate file. Note: The certificate name (as opposed to the file name) will always be set to WinDriver1630.development. |
remove | Removes a certificate from local machine stores: 'Personal', 'Trusted Root Certification Authorities' and 'Trusted Publishers'. filepath should be the path of the .cer file of the certificate you wish to remove. |
⚠ Attention
You must have administrative rights to create/remove certificates from local machine certificate stores.
ℹ️ Note
There are two types of certificate stores:
- Local machine certificate store.
- Current user certificate store.
Local machine stores are shared between all users, as opposed to current user stores, which are specific to the current user. As mentioned before, WinDriver places test certificates only in the local machine certificate store.
To verify a certificate was created and installed, open the run dialog box (winkey+r) and enter certlm.msc; the certificate manager tool for the local machine will open. In the manager you can view certificates installed in the relevant stores: 'Personal', 'Trusted Root Certification Authorities' and 'Trusted Publishers'
windrvr1630.sys is digitally signed by Jungo and Microsoft, as opposed to a renamed driver generated by DriverWizard which is not signed, and therefore there is a difference in prerequisites for installing the different INF files.
The following table summarizes the different prerequisites:
| INF Type | Secure Boot | Test Signing Mode* | Test Signed INF** | Test Certificate Installed*** | Will I be able to install the INF? |
|---|---|---|---|---|---|
Device INF requiring the WinDriver driver windrvr1630.sys | Enabled | X (enforced by Secure Boot on) | V | V | Yes |
| Disabled | X | V | V | Yes | |
| Disabled | V | V | V | Yes | |
| Disabled | V | V | X | Yes, you will be prompted to authorize the installation | |
| Disabled | X | V | X | No | |
Device INF requiring a renamed driver <projectname>.sysand the driver INF for the renamed driver | Enabled | X (enforced by Secure Boot on) | V | V | No |
| Disabled | X | V | V | No | |
| Disabled | V | V | V | Yes | |
| Disabled | V | V | X | Yes, you will be prompted to authorize the installation | |
| Disabled | X | V | X | No |
*To enable test signing mode see Chapter 17.3.5.1.1 Enabling and Disabling Test Signing Mode or 3.2.1.1. Setting up Test Signing.
**To generate test signed INF files via DriverWizard see Chapter 17.3.5.3 How to Generate Test Signed INF Files in DriverWizard Code Generation?.
***To create the WinDriver test certificate see Chapter 17.3.5.1.2 Creating and Removing the WinDriver Test Certificate.
Note:This table displays only some of the cases, and the behaviour may vary between different versions of Windows.
If your testing computer is not your development computer (the computer running DriverWizard), then you need to set up your testing computer before installing test signed INF files:
<projectname>\<projectname_installation>\redist:.cer file - the test certificate used to sign the INF files.install_test_cert.bat and uninstall_test_cert.bat - scripts for installing and uninstalling the test certificate (when running one of the scripts, make sure the .cer file is in the same folder as the script). install_test_cert.bat and uninstall_test_cert.bat with administrative privileges in order to install/uninstall the test certificate.After you have installed the test certificate you can install the test signed INF files using wdreg. See Chapter 16.2.1.1. WDM Drivers for more information on how to install the driver and device INFs.
Once you have created and installed the WinDriver test certificate, every INF created in the code generation process will have an associated catalog file that is test signed.
To create and install the WinDriver test certificate either check the 'Create test certificate' checkbox in the WinDriver installer (as explained in 3.2.1.1. Setting up Test Signing), or manually create and install the WinDriver test certificate (as explained in 17.3.5.1.2 Creating and Removing the WinDriver Test Certificate).
⚠ Attention
In order to load test signed INFs, you might need to enable test signing mode
>(as explained in 17.3.5.1.1 Enabling and Disabling Test Signing Mode). >See Chapter 17.3.5.2.1 Prerequisites for Installing Test Signed INF Files >for more information about when test signing mode is mandatory.
ℹ️ Note
Inf2Cat and SignTool are command line tools provided with the Windows Driver Kit (WDK). You can run them from Visual Studio Developer PowerShell or Visual Studio Developer Command Prompt, without the need to use their full path or to add them to your PATH environment variable.
To manually test sign INF files: