|
Jungo WinDriver
Official Documentation
|
|
Jungo WinDriver
Official Documentation
|
This chapter describes the WinDriver DriverWizard utility and its hardware diagnostics and driver code generation capabilities.
DriverWizard (included in the WinDriver toolkit) is a graphical user interface (GUI) tool that is targeted at two major phases in the hardware and driver development:
Hardware diagnostics
DriverWizard enables you to write and read hardware resources before writing a single line of code. After the hardware has been built, insert your device into the appropriate bus slot on your machine, view its resources and configuration — and verify the hardware's functionality.
Code generation
Once you have verified that the device is operating to your satisfaction, use DriverWizard generate skeletal driver source code with functions to view and access your hardware's resources.
If you are developing a driver for a device that is based on an enhanced-support PCI chipset (PLX 6466, 9030, 9050, 9052, 9054, 9056, 9080 and 9656; Altera Qsys, Avalon-MM designs; Xilinx BMD, XDMA, QDMA designs), we recommend that you first read Chapter 9: Enhanced Support for Specific Chipsets to understand your development options.
On Windows, DriverWizard can also be used to generate an INF file for your hardware.
The code generated by DriverWizard is composed of the following elements:
To use DriverWizard, follow these steps.
Attach the card to the appropriate bus slot on your computer.
For a virtual PCI device, you have the option to use DriverWizard to generate code without having the actual device installed, by selecting the PCI Virtual Device DriverWizard option (see information in Step 2). When selecting this option, DriverWizard will generate code for your virtual PCI device.
ℹ️ Note
Use the virtual PCI device option when you are unable to connect your PCI device to your development computer. This will generate code that is less customized for your device, but you will be able to later add the customizations for your device to the generated code manually.
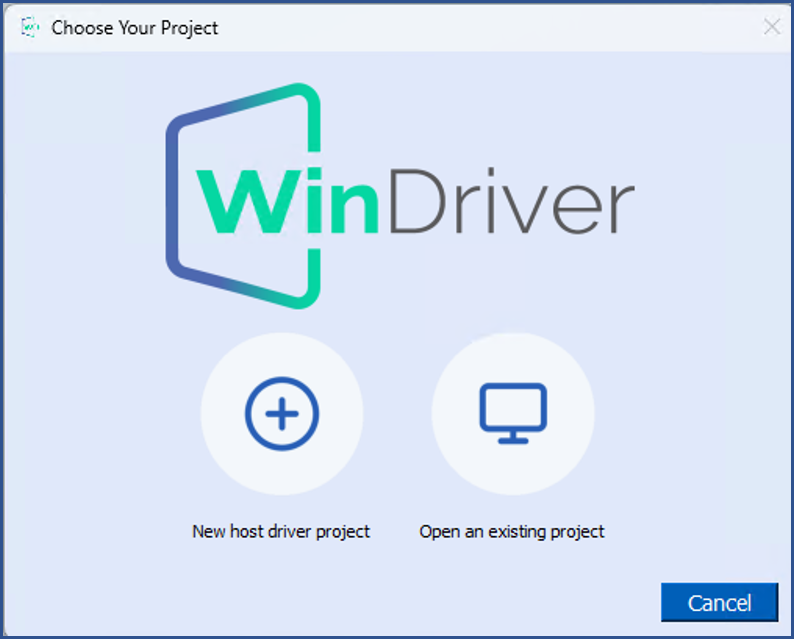
<path to WinDriver>/wizard/wdwizard. On Windows you can also run DriverWizard from the Start menu: Start | Programs | WinDriver | DriverWizard. On Windows and Linux you must run DriverWizard as administrator/root.Create or Open a Driver Project
Select Your Device
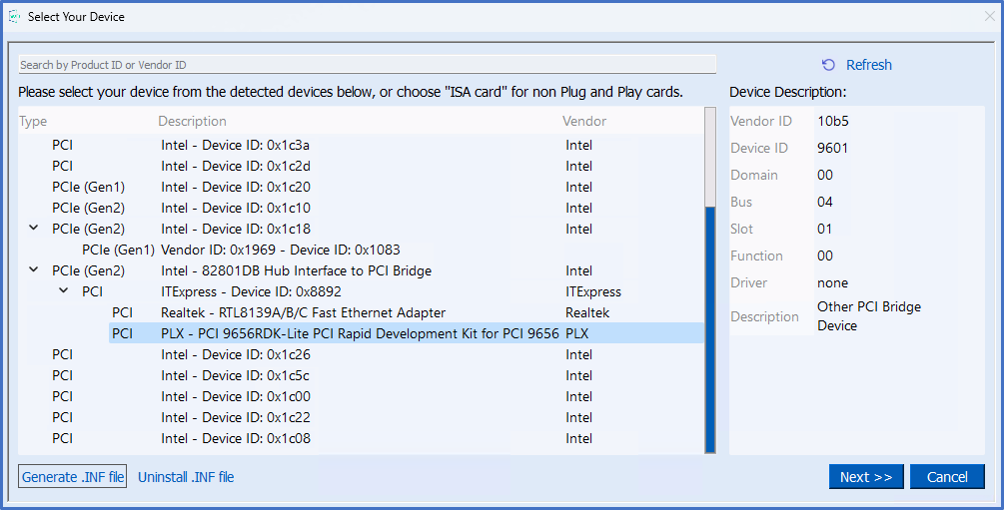
For non-Plug-and-Play cards, select ISA.
To generate code for a PCI device that is not currently attached to the computer, select PCI Virtual Device. When selecting the PCI Virtual Device option, DriverWizard allows you to define the device's resources. By specifying the I/O and/or memory ranges, you may further define run-time registers (the offsets are relative to BARs). In addition, the IRQ must be specified if you want to generate code that acknowledges interrupts via run-time registers.
⚠ Attention
If a PCI device is attached physically to the development computer, The IRQ number and the size of the I/O and memory ranges are irrelevant, since these will be automatically detected by DriverWizard. Until WinDriver 14.40 - the maximum [WD_CARD_ITEMS] (WD_CARD) that were available was 20, from WinDriver 14.50 onwards the maximum is 128.
If you don't need to generate and install an INF file (e.g., if you are using DriverWizard on a non-Windows OS), skip this step.
In Windows, after you select a device, you will be prompted to enter a name and a location for your project. If you want to generate an INF without saving a new project, click the Generate .INF file button instead of Next.
On the supported Windows operating systems, the driver for Plug-and-Play devices is installed by installing an INF file for the device. DriverWizard enables you to generate an INF file that registers your device to work with WinDriver (i.e., with the windrvr1630.sys driver). The INF file generated by DriverWizard should later be distributed to your Windows customers, and installed on their PCs. The INF file that you generate in this step is also designed to enable DriverWizard to diagnose your device on Windows (for example, when no driver is installed for your PCI/USB device). Additional information concerning the need for an INF file is provided in 17.1.1. Why Should I Create an INF File?.
⚠ Attention
On Windows 10 or higher you must disable digital signature enforcement in order to install unsigned INF files generated by the DriverWizard, or enter test signing mode and create a WinDriver test certificate (using
wdreg) in order to install test signed INF files generated by the DriverWizard. See 17.3.4. Temporary disabling digital signature enforcement in Windows 10 and 17.3.5.3 How to Generate Test Signed INF Files in DriverWizard Code Generation?.Make sure that this was done prior to performing the following steps, otherwise they will not work.
To generate and install the INF file with DriverWizard, do the following:
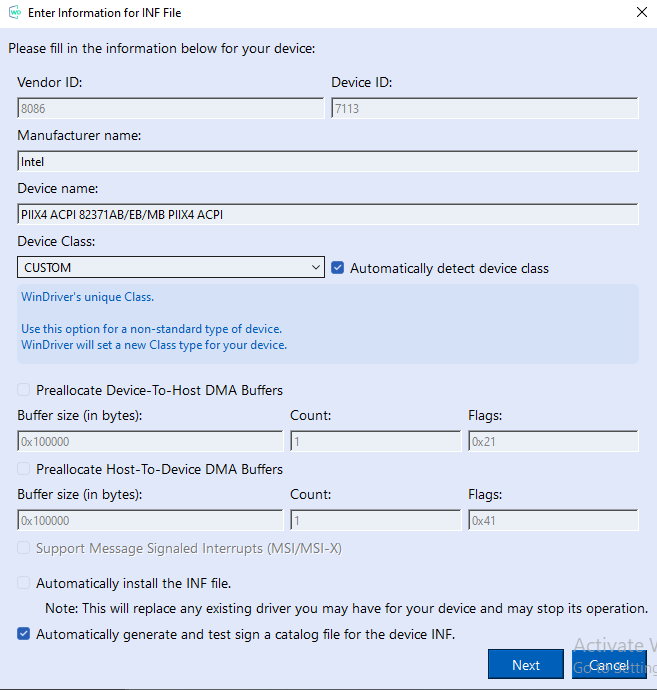
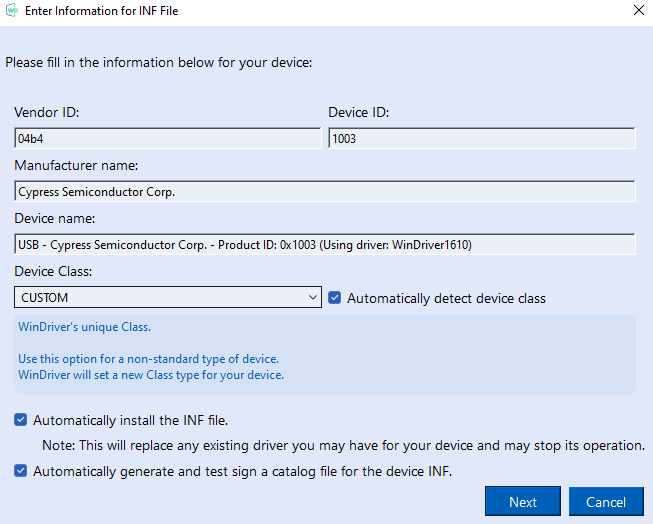
DriverWizard INF File Information
⚠ Attention
For multiple-interface USB devices, you can select to generate an INF file either for the composite device or for a specific interface. When selecting to generate an INF file for a specific interface of a multi-interface USB device the INF information dialogue will indicate for which interface the INF file is generated. When selecting to generate an INF file for a composite device of a multi-interface USB device, the INF information dialogue provides you with the option to either generate an INF file for the root device itself, or generate an INF file for specific interfaces, which you can select from the dialogue. Selecting to generate an INF file for the root device will enable you to handle multiple active interfaces simultaneously.
DriverWizard will then automatically generate the INF file for you. You can choose to automatically install the INF file by checking the Automatically Install the INF file option in the DriverWizard's INF generation dialogue. If the automatic INF file installation fails, DriverWizard will notify you and provide manual installation instructions (refer also the manual INF file installation instructions in 17.1. Windows INF Files.
For further information on Preallocating DMA Buffers in Windows,
please refer to 11.2.2.4. Preallocating Contiguous DMA Buffers on Windows.
Handling of PCI Message-Signaled Interrupts (MSI) and Extended Message- Signaled Interrupts (MSI-X) requires specific configuration in the device's INF file,
as explained in 10.1.7.1. Windows MSI/MSI-X Device INF Files.
On Windows, if your hardware supports MSI or MSI-X, the Support Message Signaled Interrupts option in the DriverWizard's INF generation dialogue will be enabled and checked by default. When this option is checked, the generated DriverWizard INF file for your device will include support for MSI/ MSI-X handling. However, when this option is not checked, PCI interrupts will be handled using the legacy level-sensitive interrupts method, regardless of whether the hardware and OS support MSI/MSI-X.
On Windows, the Automatically generate and test sign a catalog file for the INF option in the DriverWizard's INF generation dialog will be checked by default. When this option is checked, in addition to the INF file, a catalog will be generated. The catalog file contains information on the INF file and a digital signature.
Note: You must run DriverWizard with administrative privileges in order to test sign the generated catalog file.
Since WinDriver 16.2.0, Jungo has added the option to create an INF file that supports both legacy Windows 10 versions (build 18363 and below) and modern Windows versions (build 19041 and later). That is because Microsoft has imposed certain changes so that newer WinDriver based drivers will not work on legacy Windows 10 versions.
To generate code that supports legacy Windows 10 (build 18363 and below) and modern Windows versions (build 19041 and later) open the Select Your Device screen, then select Generate INF file and finally, check the Add support for Windows 10 builds prior to build 19041 checkbox.
By checking this checkbox, generated code will:
Include two versions of .sys files:
i.<projectname>_installation/redist/<projectname>.sys - for newer Windows versions (version from build 19041 and later) ii.<projectname>_installation/redist/<projectname>_legacy.sys - legacy Windows 10 versions (version below build 18363)
On Windows, you can use DriverWizard to uninstall a previously installed device INF file. This will unregister the device from its current driver and delete the copy of the INF file in the Windows INF directory.
In order for WinDriver to correctly identify the resouces of a Plug-and-Play device and communicate with it — including for the purpose of the DriverWizard device diagnostics outlined in the next step — the device must be registered to work with WinDriver via an INF file.
If you do not wish to uninstall an INF file, skip this step.
To uninstall the INF file, do the following:
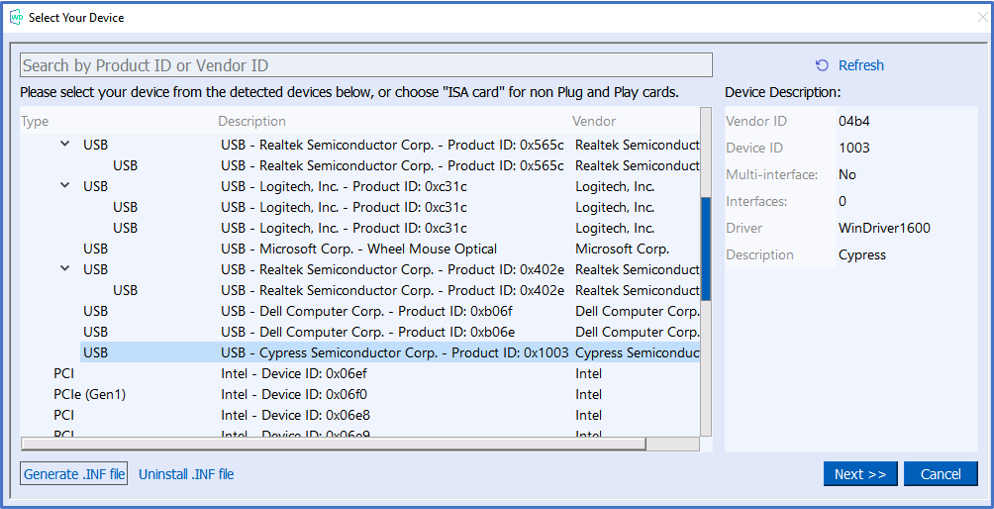
Skip this step if your device is not a USB device
DriverWizard detects all the device's supported alternate settings and displays them. Select the desired alternate setting from the displayed list.
Select Device Interface
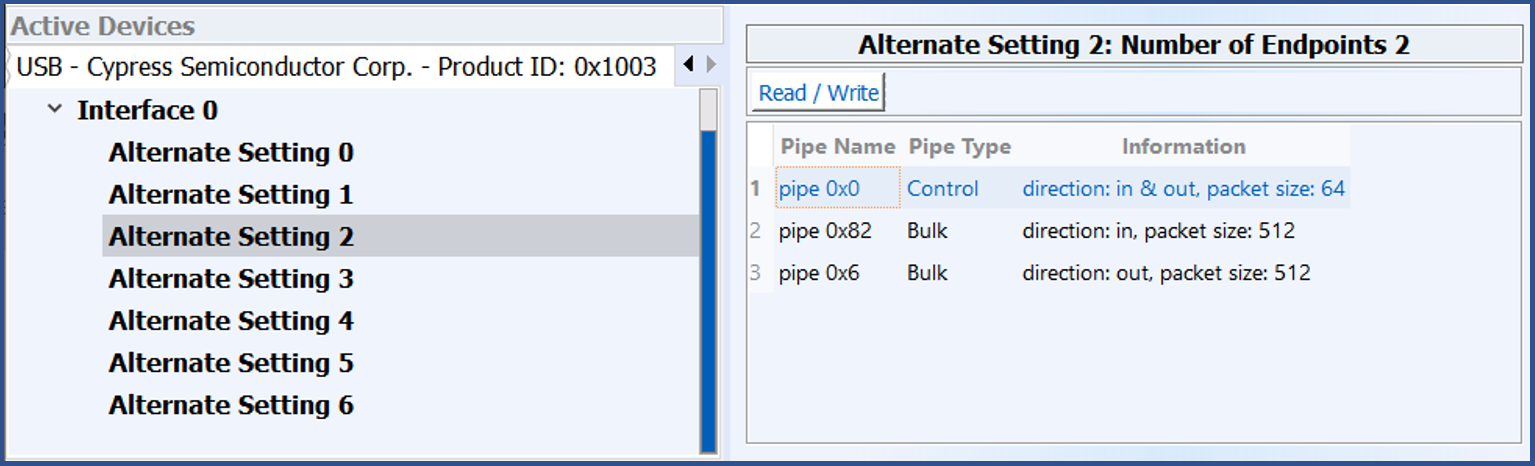
DriverWizard will display the pipes information for the selected alternate setting. For USB devices with only one alternate setting configured, DriverWizard automatically selects the detected alternate setting and therefore the Select Device Interface dialogue will not be displayed.
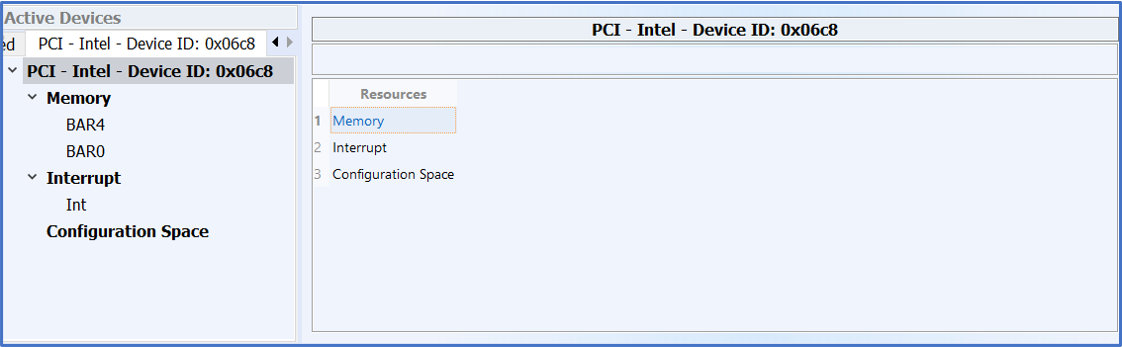
Skip this step if your device is not a PCI device Before writing your device driver, it is important to make sure your hardware is working as expected. Use DriverWizard to diagnose your hardware. All of your activity will be logged in the DriverWizard log so that you may later analyze your tests.
Define and test your device's I/O and memory ranges, registers and interrupts:
PCI Resources
For non-Plug-and-Play hardware, define your hardware's resources manually.
On Windows, you may need to register an IRQ with WinDriver before you can assign it to your non-Plug-and-Play hardware see 10.1.3. Registering IRQs for Non-Plug-and-Play Hardware.
You can also manually define hardware registers, as demonstrated below. Registers are user-defined locations in BARs, that the user can perform I/O with, give them a human readable name and use them for Transfer Commands and Predefined Action Flows as will be shown next. Registers that are defined using DriverWizard will later be reflected as objects in the code DriverWizard will generate for your project, with the same names defined for them in the DriverWizard.
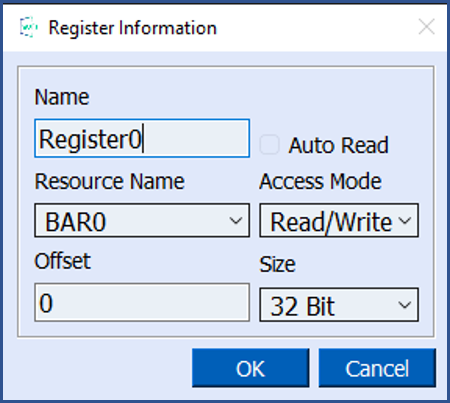
When defining registers, you may check the Auto Read box in the Register Information window. Registers marked as Auto Read will automatically be read for any register read/write operation performed from DriverWizard. The read results will be displayed in the wizard's Log window.
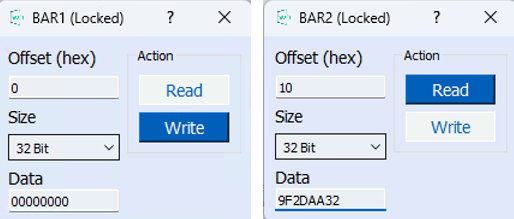
Read/Write Memory and I/O
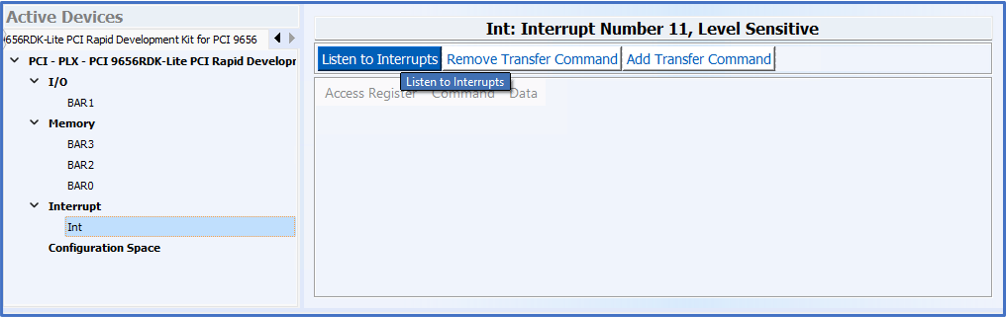
DriverWizard allows the user to access the device's interrupts, and define transfer commands to be triggered when an interrupt occurs. The defined transfer commands must be using one the Registers defined in the previous section. For further reading on interrupt handling with WinDriver, see 10.1. Handling Interrupts .
After defining the transfer commands you wish to run, use the "Listen To Interrupts" button to wait for an interrupt to be raised. When it will be raised (either by writing to your device, also using the Wizard, or interenally from the device itself), the Log panel will indicate that an interrupt was recieved, and if transfer commands were defined to address that interrupt, they will be activated and their results should also appear in the Log panel.
Transfer commands that are defined using DriverWizard will later be reflected in the Interrupt-related functions in the code DriverWizard will generate for your project as WD_TRANSFER objects that are passed to the WDC_IntEnable() function, with the same names defined for them in the DriverWizard.
Listen to Interrupts
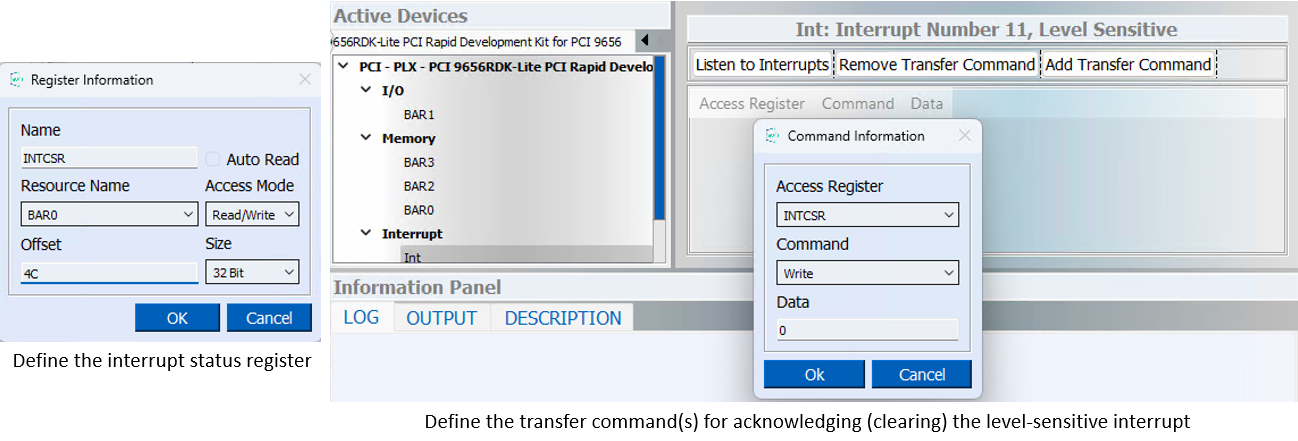
Note: For level-sensitive interrupts, such as legacy PCI interrupts, you must use DriverWizard to define the interrupt status register and assign the read/write command(s) for acknowledging (clearing) the interrupt, before attempting to listen to the interrupts with the wizard, otherwise the OS may hang!
Figure below demonstrates how to define an interrupt acknowledgment command for a defined INTCSR hardware register. Note, however, that interrupt acknowledgment information is hardware-specific.
Define Transfer Commands for Level-Sensitive Interrupts
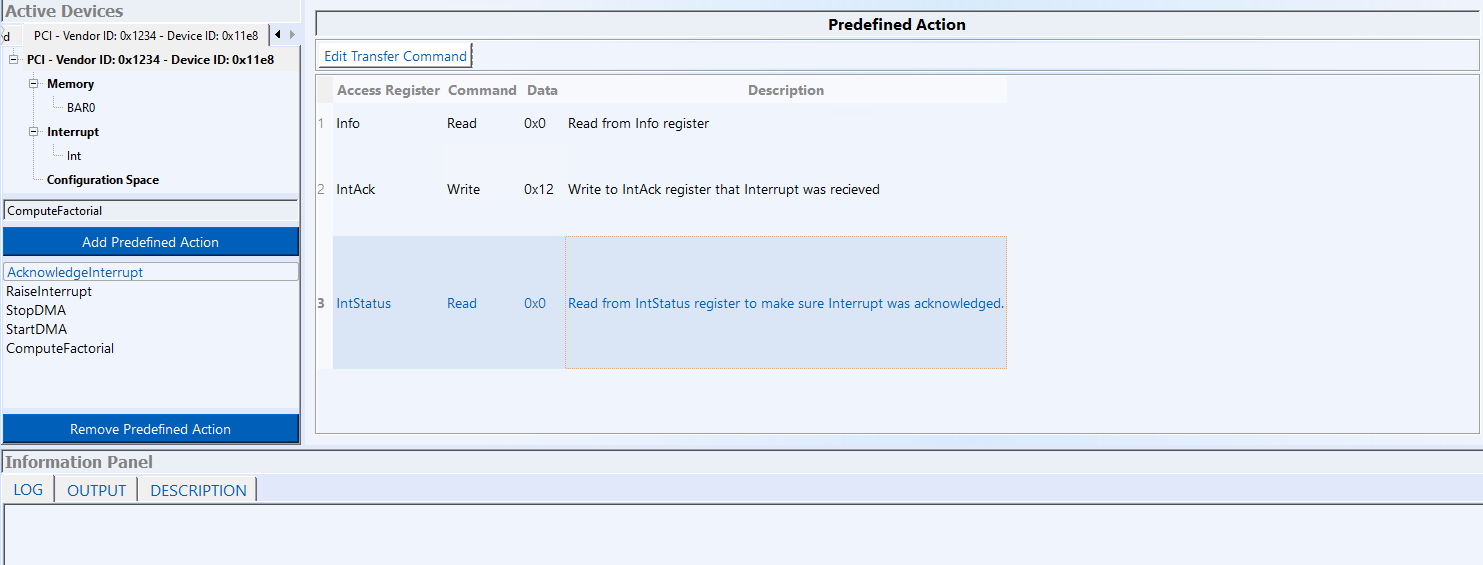
DriverWizard allows you to also use Transfer Commands for Predefined Action Flows.
Predefined Action Flows (PDAs) are lists of I/O actions to be executed consecutively. The defined transfer commands must be using one the Access Registers defined in previous sections.
After defining the transfer commands in the flow, the user can run the flow using the Run Flow button, and the flow will be executed consecutively from the DriverWizard. The user can define multiple flows in a project.
PDAs that are defined in DriverWizard will be reflected as functions in the generated code, that are accessible from the "Predefined Action Flows" menu when running the generated code with the same names and attributes defined for them in the DriverWizard. Using PDAs allows the user to save programming time by using the DriverWizard GUI instead.
Skip this step if your device is not a USB device Before writing your device driver, it is important to make sure your hardware is working as expected. Use DriverWizard to diagnose your hardware. All of your activity will be logged inthe DriverWizard log so that you may later analyze your tests.
USB Control Transfers
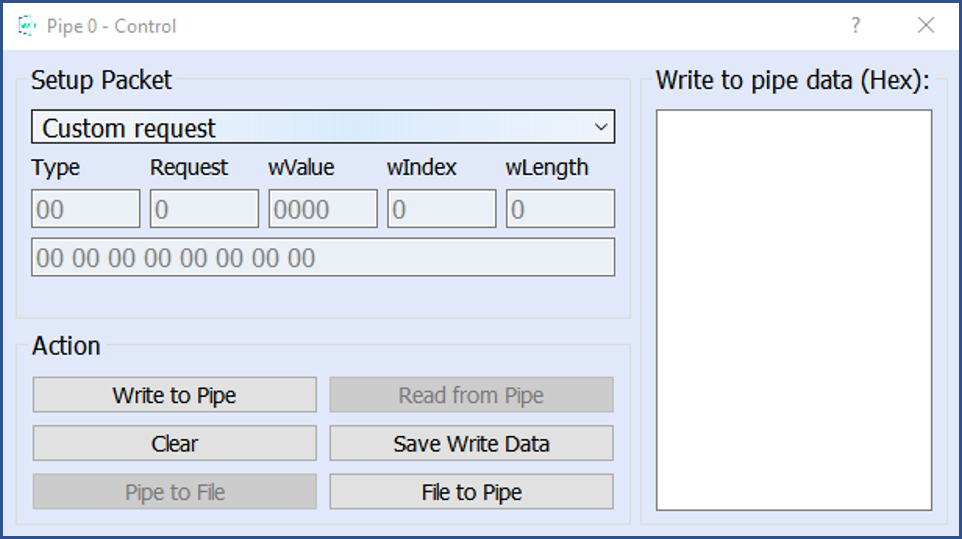
When you select one of the available standard USB requests, the setup packet information for the selected request is automatically filled and the request description is displayed in the Request Description box. For a custom request, you are required to enter the setup packet information and write data (if exists) yourself. The size of the setup packet should be eight bytes and it should be defined using little endian byte ordering. The setup packet information should conform to the USB specification parameters (bmRequestType, bRequest, wValue, wIndex, wLength).
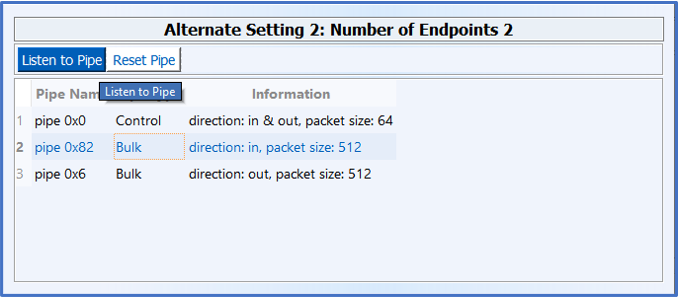
For an input pipe (moves data from device to host) click Listen to Pipe. To successfully accomplish this operation with devices other than HID, you need to first verify that the device sends data to the host. If no data is sent after listening for a short period of time, DriverWizard will notify you that the Transfer Failed.
To stop reading, click Stop Listen to Pipe.
Listen to Pipe
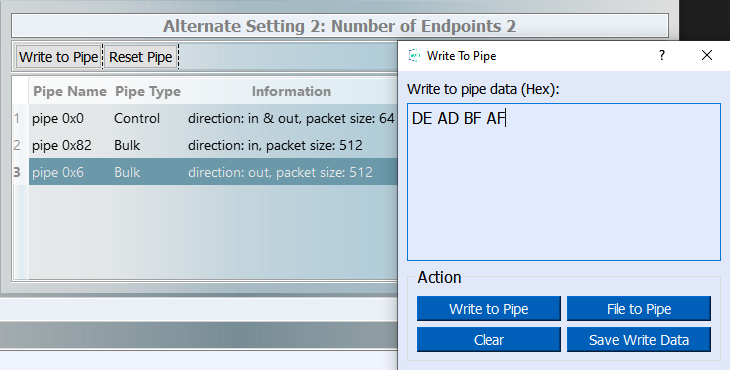
For an output pipe (moves data from host to device), click Write to Pipe. A new dialogue box will appear asking you to enter the data to write. The DriverWizard log will contain the result of the operation.
Write to Pipe
You can reset input and output pipes by pressing the Reset Pipe button for the selected pipe.
DriverWizard allows users to import register information from a Comma Separted Values(CSV) file instead of having to type it manually for each register. This register information is used later in order to automatically generate code.
Use a text or spreadsheet editor to create a CSV in the following format:
After you have finished diagnosing your device and have ensured that it runs according to your specifications, you are ready to write your driver.
You can generate code by selecting this option either via DriverWizard's Generate Code toolbar icon or from the Wizard's Project | Generate Code menu. After you select a code generation option of your choice, DriverWizard will generate the source code for your driver, and save it together with the Wizard driver-project file (xxx.wdp, where "xxx" is the project name). The files are saved in a directory DriverWizard creates for every development environment and operating system selected in the code generation dialogue.
⚠ Attention
Close DriverWizard to avoid device overlap errors.
Use this code as a starting point for your device driver. Modify where needed to perform your driver's specific functionality.
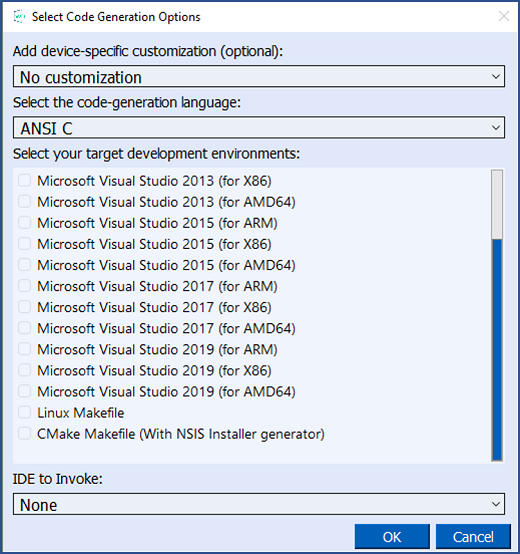
If you choose to generate code either via the Generate Code toolbar icon or from the Generate Code menu, in the Select Code Generation Options dialogue box that will appear, you may optionally select to generate additional customized code for one of the supported devices. Then you choose the code language and development environment(s) for the generated code and select Next to generate the code.
PCI Code Generation Options
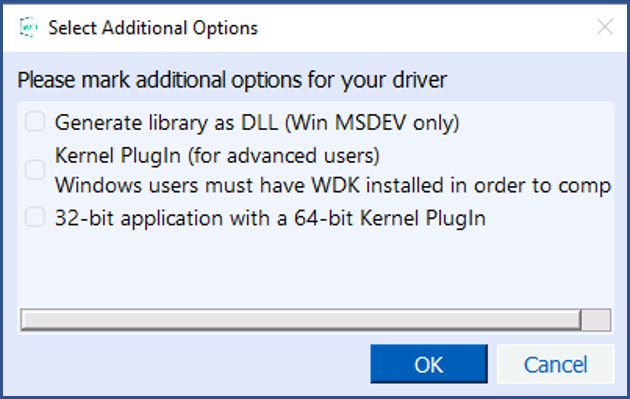
Then click Next and select whether to handle Plug-and-Play and power management events from within your driver code, whether to generate Kernel PlugIn code (see Chapter 12: Understanding the Kernel PlugIn) (and what type of related application to create), and whether to build your project's library as a DLL (for MS Visual Studio Windows projects).
PCI Additional Driver Options
Kernel PlugIn Windows Project Notes:
Windows test signed driver package:
If you have followed the instruction in Chapter 17.3.5.3 How to Generate Test Signed INF Files in DriverWizard Code Generation?, then all INF files created in the code generation process will have an associated catalog file that contains information about the INF and a digital signature.
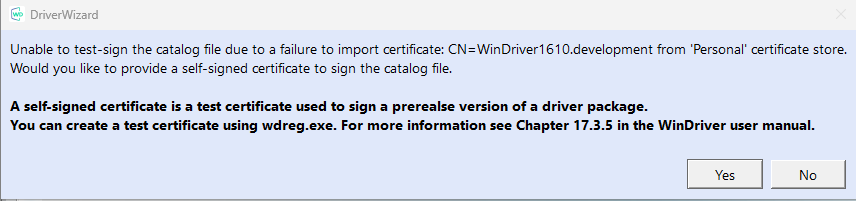
If you did not follow the instructions in Chapter 17.3.5.3 How to Generate Test Signed INF Files in DriverWizard Code Generation?, then during the code generation process, you will be prompted to enter a .cer file to be used when the DriverWizard signs the catalog file.
Note: You must run DriverWizard with administrative privileges in order to test sign the generated catalog file.
After you choose the code, you can compile and run it:
In addition, WinDriver includes a variety of samples that demonstrate how to use WinDriver's API to communicate with your device and perform various driver tasks:
WinDriver/samples/c directory.WinDriver/samples/python directory.WinDriver/samples/java directory.WinDriver/samples/csharp.net directory.WinDriver/samples/vb.net directory.WinDriver/samples/powershell directory.In the source code directory you now have a new xxx_lib.h file, which contains type definitions and functions declarations for the API created for you by the DriverWizard, and an xxx_lib.c source file, which contains the implementation of the generated device-specific API.
In addition, you will find an xxx_diag.c source file, which includes a main() function and implements a sample diagnostics application that utilizes the generated DriverWizard API to communicate with your device.
⚠ Attention
For USB you will only have a
xxx_diag.csource file. This file implements a diagnostic USB application, which demonstrates how to use WinDriver's USB API to locate and communicate with your USB device(s), including detection of Plug-and-Play events (device insertion/removal, etc.),performing read/write transfers on the pipes, resetting the pipes and changing the device's active alternate setting. The generated application supports handling of multiple identical USB devices.
The code generated by DriverWizard is composed of the following elements and files, where xxx represents your DriverWizard project name:
xxx_lib.c — the implementation of the hardware-specific API (declared in xxx_lib.h), using the WinDriver Card (WDC) API .xxx_lib.h — a header file that contains type definitions and function declarations for the API implemented in the xxx_lib.c source file.You should include this file in your source code to use the API generated by DriverWizard for your device.
xxx_lib.h) to communicate with your device(s):xxx_diag.c The source code of the generated diagnostics console application. Use this diagnostics program as your skeletal device driver.xxx_files.txt.After creating your code, compile it with your favorite compiler, and see it work!
Change the function main() of the program so that the functionality suits your needs.
After generating Python code in the DriverWizard, in the source code directory you now have a new xxx_lib.py file, which contains type definitions and function implementations for the API created for you by the DriverWizard. In addition, you will find an xxx_diag.py source file, which includes a main() function and implements a sample diagnostics application that utilizes the generated DriverWizard API to communicate with your device.
The wdlib subdirectory includes shared Python code files that implement the WinDriver API structs, import the WinDriver user API DLL file, define variables, and implement user I/O functions required for the user application to run. The code generated by DriverWizard is composed of the following elements and files, where xxx represents your DriverWizard project name:
xxx_lib.py — type definitions and the implementation of the hardware-specific API, using the WinDriver Card (WDC) API.xxx_lib.py) to communicate with your device(s): xxx_diag.py - the source code of the generated diagnostics console application. Use this diagnostics program as your skeletal device driver.xxx_files.txt.After creating your code, run it with your favorite Python interpreter. Change the function main() of the program so that the functionality suits your needs.
After generating Python code in the DriverWizard, in the source code directory you now have a new xxx_diag.py source file (where xxx is the name you selected for your DriverWizard project). This file implements a diagnostic USB application, which demonstrates how to use WinDriver’s USB API to locate and communicate with your USB device(s), including detection of Plug-and-Play events (device insertion/removal, etc.), performing read/write transfers on the pipes, resetting the pipes and changing the device’s active alternate setting. The generated application supports handling of multiple identical USB devices.
The wdlib subdirectory includes shared Python code files that implement the WinDriver API structs, import the WinDriver user API DLL file, define variables, and implement user I/O functions required for the user application to run.
After generating Java code in the DriverWizard, in the source code directory you now have a new xxxLib.java file, which contains type definitions and function implementations for the API created for you by the DriverWizard. In addition, you will find an xxxDiag.java source file, which includes a main() function and implements a sample diagnostics application that utilizes the generated DriverWizard API to communicate with your device.
The com\jungo\shared subdirectory and the xxx_installation\redist\wdapi_java1630.jar includes shared Java code files that implement the WinDriver API structs, import the WinDriver user API DLL file, define variables, and implement user I/O functions required for the user application to run.
A very important file is the Java Native Interface (JNI) file wdapi_java1630.dll that provides the interface between the Java layer and your native wdapi1630.dll file provided with WinDriver. Make sure that the JNI file corresponds with the architecture and bits of the Java Virtual Machine (JVM) you'll be using to run the application.
The code generated by DriverWizard is composed of the following elements and files, where xxx represents your DriverWizard project name:
xxxLib.java — type definitions and the implementation of the hardware-specific API, using the WinDriver Card (WDC) API.xxxDiag.java - the source code of the generated diagnostics console application. Use this diagnostics program as your skeletal device driver.xxx_files.txt.After creating your code, you can either compile and run it from the command line as described below or open it with the Eclipse IDE. Change the function main() of the program so that the functionality suits your needs.
After generating Java code in the DriverWizard, in the source code directory you now have a new xxxDiag.java source file (where xxx is the name you selected for your DriverWizard project). This file implements a diagnostic USB application, which demonstrates how to use WinDriver’s USB API to locate and communicate with your USB device(s), including detection of Plug-and-Play events (device insertion/removal, etc.), performing read/write transfers on the pipes, resetting the pipes and changing the device’s active alternate setting. The generated application supports handling of multiple identical USB devices.
The com\jungo\shared subdirectory and the xxx_installation\redist\wdapi_java1630.jar includes shared Java code files that implement the WinDriver API structs, import the WinDriver user API DLL file, define variables, and implement user I/O functions required for the user application to run.
A very important file is the Java Native Interface (JNI) file wdapi_java1630.dll that provides the interface between the Java layer and your native wdapi1630.dll provided with WinDriver. Make sure that the JNI file corresponds with the architecture and bits of the Java Virtual Machine (JVM) you’ll be using to run the application.
After creating your code, you can either compile and run it from the command line as described below, or open it with the Eclipse IDE.
You can use WinDriver’s DriverWizard utility to generate C# (USB and PCI) and Visual Basic.NET (USB only). To develop a C# driver with WinDriver, either use DriverWizard to generate a driver application for your device, or use the WinDriver .NET samples, which utilize the WinDriver .NET API DLL, that most matches your design, and then modify the generated/sample code in accordance with your hardware specification and desired driver functionality. Alternatively, you can use the generated/sample code as a reference for writing your own WinDriver C# driver:
PCI:
WinDriver\samples\csharp.net\pci_sample directory contains a .NET PCI library (pci_lib.dll) and a sample GUI-based PCI diagnostics application (pci_sample.exe), both implemented in C#. This sample is based on the Windows Forms framework, only supported natively on Windows.WinDriver\samples\c\plx\dotnet directory contains a C# library (plx_lib_dotnet.dll) and sample diagnostics application (PLX_Sample.exe), designed specifically for handling PLX devices. This sample is based on the Windows Forms framework, only supported natively on Windows.WinDriver\samples\csharp\pci_diag directory contains a .NET PCI Console sample similar to the console pci_diag sample Jungo provides in other languages. This sample is supported on Windows, Linux and MacOS.USB:
WinDriver\samples\csharp.net\usb_sample directory contains a .NET USB library (usb_lib_dotnet.dll) and a sample USB diagnostics application (csharp_usb_sample.exe), both implemented in C#.WinDriver\samples\vb.net\usb_sample directory contains a sample .NET USB diagnostics application (vb_usb_sample.exe), implemented in VB.NET. This sample is similar to the sample C# USB diagnostics application and also uses the sample C# USB library (usb_lib_dotnet.dll).If using the DriverWizard in the source code directory you now have a new lib subdirectory, which contains type definitions and function implementations for the API created for you by the DriverWizard. This subdirectory outputs a DLL file that is compiled by the xxx_diag project. In addition, you will find a diag subdirectory, a sample diagnostics application that utilizes the generated DriverWizard API to communicate with your device. The xxx_diag.cs file that includes a Main() function. A list of all files created can be found at xxx_files.txt.
After creating your code, compile it with your favorite C# compiler. Change the function Main() of the program so that the functionality suits your needs.
As explained above, on Windows you can select to generate project, solution, and make files for the supported compilers and development environments — MS Visual Studio, Windows GCC(MinGW/Cygwin). For integrated development environments (IDEs), such as MS Visual Studio, you can also select to automatically invoke your selected IDE from the wizard. You can then proceed to immediately build and run the code from your selected IDE.
You can also build the generated code using any other compiler or development environment that supports the selected code language and target OS. Simply create a new project or make file for your selected compiler/environment, include the generated source files, and run the code. For Windows, the generated compiler/environment files are located under an x86 directory — for 32-bit projects — or an amd64 directory — for 64-bit projects. To build a Kernel PlugIn project (on Windows), follow the instructions in 13.8.1. Windows Kernel PlugIn Driver Compilation.
Use the makefile that was created for you by DriverWizard in order to build the generated code using your favorite compiler, preferably GCC. To build a Kernel PlugIn project, follow the instructions in 13.8.2. Linux Kernel PlugIn Driver Compilation.
The recommended way is using CMake, which simplifies compilation and portability between IDEs and platforms.
⚠ Attention
MacOS Code generation with WinDriver works only with CMake.
Open a terminal window:
On MacOS, to create an XCode project instead of a make project, run CMake in the following manner:
Although compiling on Windows is preferable with Visual Studio, your project can also be compiled using MinGW.
Compile the wdapi shared library:
Copy the library to the bin directory of your MinGW installation folder (i.e C:\msys64\mingw64\bin):
In PATH_TO_YOUR_PROJECT/CMakeLists.txt, change the line target_link_libraries(your_project ${WDAPI_LIB}) to:
Compile your user application:
the program should compile and be able to run now.
When compiling with the dotnet command (available after installing .NET Core on Windows/Linux/Mac) there are two options to run the compiled user application:
Please follow these steps:
WinDriver\my_projects\xxx.Please follow the next steps:
C:\Program Files \Java\jdkX.X.X_XXX\bin, replace the Xs with your JDK version).In Linux/MacOS:
Run cmake on the project folder
Compile the classes
Run the Java application
Please follow the next steps:
C:\Program Files \Java\jdkX.X.X_XXX\bin, replace the Xs with your JDK version).In Windows:
Compile the generated code:
In Windows:
In Linux/MacOS:
Run the generated code:
In Windows:
In Linux/MacOS:
The main difference between C#/Java/Python and C is that the former languages have a garbage collector which automatically manages the memory, whereas C is totally "manual" - meaning that it is the user's responsibility to allocate and free memory from the heap (using malloc() and free()). Some WinDriver APIs that are written in C require usage of unmanaged memory.
For each "managed" langauge that WinDriver supports, WinDriver provides a sample of this kind of use:
WinDriver/samples/csharp.net/pci_sample/lib/dma.cs (Using the System.Runtime.InteropServices.Marshal class)WinDriver/samples/python/pci_diag.py (Using global variables and the ctypes class)WinDriver/samples/java/com/jungo/PciDiag.Java (Using the java.nio.ByteBuffer class).