Jungo WinDriver  
Official Documentation
Chapter 11: Improving PCI Performance

11.1. Improving PCI Performance Overview

Once your user-mode driver has been written and debugged, you might find that certain modules in your code do not operate fast enough (for example: an interrupt handler or accessing I/O mapped regions). If this is the case, try to improve performance in one of the following ways:

In general (this is true for most cases) I/O transfers from and to your PCI device could be of the following types: (This could vary depending on the device)

Transfer type Speed Hardness of implementation
Blocking Slowest Easy, use WDC_ReadAddrBlock() / WriteAddrBlock()
Non Blocking Slower Easy, use WDC_ReadAddrXXX / WDC_WriteAddrXXX
DMA with interrupts method Fast Harder to implement, requires using WDC_DMASGBufLock() / WDC_DMAContigBufLock() and a firm understanding of the device's specifics
DMA with polling method Fastest Harder to implement, requires using WDC_DMASGBufLock() / WDC_DMAContigBufLock() and a firm understanding of the device's specifics

WinDriver's enhanced support's advantage is that it saves the developer time on getting acquainted with the popular DMA IPs available on the market today, and allows them to utilize DMA without having to spend time on learning how to implement DMA for their device, or at least reducing their learning curve. For more info see Chapter 9: Enhanced Support for Specific Chipsets.

Use the following checklist to determine how to best improve the performance of your driver.

11.1.1. Performance Improvement Checklist

The following checklist will help you determine how to improve the performance of your driver:

ISA Card — accessing an I/O-mapped range on the card

When transferring a large amount of data, use block (string) transfers and/or group several data transfer function calls into a single multi-transfer function call,
as explained in 11.1.3.2. Block Transfers and Grouping Multiple Transfers (Burst Transfer) below.

If this does not solve the problem, handle the I/O at kernel mode by writing a Kernel PlugIn driver, as explained in Chapter 12: Understanding the Kernel PlugIn and Chapter 13: Creating a Kernel PlugIn Driver.

PCI Card — accessing an I/O-mapped range on the card

Avoid using I/O ranges in your hardware design. Use Memory mapped ranges instead as they are accessed significantly faster.

Accessing a memory-mapped range on the card

Try to access memory directly instead of using function calls, as explained in 11.2.1. Implementing Scatter/Gather DMA below. When transferring large amounts of data, consider also the solution to problem #1 above.

If the problem persists, then there is a hardware design problem. You will not be able to increase performance by using any software design method, writing a Kernel PlugIn, or even by writing a full kernel driver.

Interrupt latency — missing interrupts, receiving interrupts too late

Handle the interrupts in the kernel mode by writing a Kernel PlugIn driver,
as explained in Chapter 12: Understanding the Kernel PlugIn and
Chapter 13: Creating a Kernel PlugIn Driver.

PCI target access vs. master access

PCI target access is usually slower than PCI master access (bus-master DMA). For large data transfers, bus-master DMA access is preferable. Read 11.2. Performing Direct Memory Access (DMA) to learn how to use WinDriver to implement bus master DMA.

11.1.2 PCI Transfers Overview

There are two PCI transfer options: reading/writing to FIFO (string transfers), or reading/writing to different memory blocks.

In the case of reading/writing to memory blocks, the data is transferred to/from a memory address in the PC from/to a memory address in the card, and then both the card’s memory address and the PC’s memory address are incremented for the next transfer. This way, the data is transferred between the address in the PC and the same relative address in the card.

PCI Transfer

In the case of reading/writing to FIFO, the data is transferred to/from a memory address in the PC from/to a single address in the card, and then only the PC’s memory address is incremented for the next transfer. This way the data is transferred between incremented memory addresses in the PC and the same FIFO in the card’s memory.

PCI String Transfer

The WD_TRANSFER structure includes an automatic increment flag, called fAutoinc. When defined as TRUE, the I/O or memory address is incremented for transfer to/from FIFO (string transfers), when defined as FALSE, all data is transferred to the same port/address.

For more information on PCI transfers, please refer to the description of WinDriver’s WD_Transfer() function, which executes a read/write instruction to an I/O port or to a memory address.

11.1.3. Improving the Performance of a User-Mode Driver

As a general rule, transfers to memory-mapped regions are faster than transfers to I/O-mapped regions, because WinDriver enables you to access memory-mapped regions directly from the user mode, without the need for a function call, as explained in 11.1.3.1. Using Direct Access to Memory-Mapped Regions.

In addition, the WinDriver APIs enable you to improve the performance of your I/O and memory data transfers by using block (string) transfers and by grouping several data transfers into a single function call, as explained in 11.1.3.2. Block Transfers and Grouping Multiple Transfers (Burst Transfer).

11.1.3.1. Using Direct Access to Memory-Mapped Regions

When registering a PCI card, using WDC_PciDeviceOpen() / WDC_IsaDeviceOpen() or the low-level WD_CardRegister() function, WinDriver returns both user-mode and kernel-mode mappings of the card's physical memory regions. These addresses can then be used to access the memory regions on the card directly, either from the user mode or from the kernel mode (respectively), thus eliminating the context switches between the user and kernel modes and the function calls overhead for accessing the memory.

The WDC_MEM_DIRECT_ADDR macro provides the relevant direct memory access base address — user-mode mapping when called from the user-mode / kernel-mode mapping when called from a Kernel PlugIn driver (see Chapter 12: Understanding the Kernel PlugIn) — for a given memory address region on the card. You can then pass the mapped base address to the WDC_ReadMem8() / WDC_ReadMem16() / WDC_ReadMem32() / WDC_ReadMem64() and WDC_WriteMem8() / WDC_WriteMem16() / WDC_WriteMem32()/ WDC_WriteMem64() macros, along with the desired offset within the selected memory region, to directly access a specific memory address on the card, either from the user mode or in the kernel. In addition, all the WDC_ReadAddr8() / WDC_ReadAddr16() / WDC_ReadAddr32() / WDC_ReadAddr64() and WDC_WriteAddr8() / WDC_WriteAddr16() / WDC_WriteAddr32() / WDC_WriteAddr64() functions — with the exception of WDC_ReadAddrBlock() and WDC_WriteAddrBlock() — access memory addresses directly, using the correct mapping, based on the calling context (user mode/kernel mode).

When using the low-level WD_xxx() APIs, the user-mode and kernel-mode mappings of the card's physical memory regions are returned by WD_CardRegister() within the pTransAddr and pUserDirectAddr fields of the pCardReg->Card.Item[i] card resource item structures. The pTransAddr result should be used as a base address in calls to WD_Transfer() or WD_MultiTransfer() or when accessing memory directly from a Kernel PlugIn driver (Chapter 12: Understanding the Kernel PlugIn).

To access the memory directly from your user-mode process, use pUserDirectAddr as a regular pointer. Whatever the method you select to access the memory on your card, it is important to align the base address according to the size of the data type, especially when issuing string transfer commands. Otherwise, the transfers are split into smaller portions.

The easiest way to align data is to use basic types when defining a buffer, i.e.:

BYTE buf[len]; /* for BYTE transfers - not aligned */
WORD buf[len]; /* for WORD transfers - aligned on a 2-byte boundary */
UINT32 buf[len]; /* for DWORD transfers - aligned on a 4-byte boundary */
UINT64 buf[len]; /* for QWORD transfers - aligned on a 8-byte boundary */
unsigned short int WORD
Definition: windrvr.h:333
unsigned char BYTE
Definition: windrvr.h:332
unsigned __int64 UINT64
Definition: windrvr.h:314
unsigned int UINT32
Definition: windrvr.h:337

11.1.3.2. Block Transfers and Grouping Multiple Transfers (Burst Transfer)

The main methods for transferring large amounts of data between PCI-device memory addresses and a host machine’s random-access memory (RAM) are block transfers (which may or may not result in PCI burst transfers), and bus-master DMA.

Block transfers are easier to implement, but DMA is much more effective and reliable for transferring large amounts of data, as explained in 11.2. Performing Direct Memory Access (DMA).

You can use the WinDriver WDC_ReadAddrBlock() and WDC_WriteAddrBlock() functions (or the low-level WD_Transfer() function with a string command) to perform block (string) transfers — i.e., transfer blocks of data from the device memory (read) or to the device memory (write). You can use also WDC_MultiTransfer() (or the low-level WD_MultiTransfer() function) to group multiple block transfers into a single function call. This is more efficient than performing multiple single transfers. The WinDriver block-transfer functions use assembler string instructions (such as REP MOVSD, or a 64-bit MMX instruction for 64-bit transfers) to move a block of memory between PCI-mapped memory on the device and the host’s RAM. From a software perspective, this is the most that can be done to attempt to initiate PCI burst transfers.

The hardware uses PCI burst mode to perform burst transfers — i.e., transfer the data in “bursts” of block reads/writes, resulting in a small performance improvement compared to the alternative of single WORD transfers. Some host controllers implement burst transfers by grouping access to successive PCI addresses into PCI bursts.

The host-side software has no way to control whether a target PCI transfer is issued as a burst transfer. The most the host can do is initiate transfers using assembler string instructions — as done by the WinDriver block-transfer APIs — but there’s no guarantee that this will translate into burst transfers, as this is entirely up to the hardware. Most PCI host controllers support PCI burst mode for write transfers. It is generally less common to find similar burst-mode support for PCI readtransfers.

To sum it up, to transfer large amounts of data to/from memory addresses or I/O addresses (which by definition cannot be accessed directly, as opposed to memory addresses), use the following methods to improve performance by reducing the function calls overhead and context switches between the user and kernel modes:

11.1.3.3. Performing 64-Bit Data Transfers

The ability to perform actual 64-bit transfers is dependent on the existence of support for such transfers by the hardware, CPU, bridge, etc., and can be affected by any of these factors or their specific combination.

WinDriver supports 64-bit PCI data transfers on the supported 64-bit platforms, as well as on Windows and Linux 32-bit x86 platforms. If your PCI hardware (card and bus) is 64-bit, the ability to perform 64-bit data transfers on 32-bit platforms will enable you to utilize your hardware's broader bandwidth, even if your host operating system is only 32-bit.

However, note that:

  • The ability to perform actual 64-bit transfers requires that such transfers be supported by the hardware — including the CPU, the PCI card, the PCI host controller, and the PCI bridge — and it can be affected by any of these components or their specific combination.
  • The conventional wisdom among hardware engineers is that performing two 32-bit DWORD transfers is more efficient than performing a single 64-bit QWORD transfer; the reason is that the 64-bit transfer requires an additional CPU cycle to negotiate a 64-bit transfer mode, and this cycle can be used, instead, to perform a second 32-bit transfer. Therefore, performing 64-bit transfers is generally more advisable if you wish to transfer more than 64 bits of data in a single burst.

This innovative technology makes possible data transfer rates previously unattainable on 32-bit platforms. Drivers developed using WinDriver will attain significantly better performance results than drivers written with the WDK or other driver development tools.

To date, such tools do not enable 64-bit data transfer on x86 platforms running 32-bit operating systems. Jungo's benchmark performance testing results for 64-bit data transfer indicate a significant improvement of data transfer rates compared to 32-bit data transfer, guaranteeing that drivers developed with WinDriver will achieve far better performance than 32-bit data transfer normally allows.

You can perform 64-bit data transfers using any of the following methods:

You can also perform 64-bit transfers to/from the PCI configuration space using WDC_PciReadCfg64() and WDC_PciReadCfgBySlot64() / WDC_PciWriteCfgBySlot64() .

The best way to improve the performance of large PCI memory data transfers is by using bus-master direct memory access (DMA), and not by performing block transfers (which as explained above, may or may not result in PCI burst transfers).

Most PCI architectures today provide DMA capability, which enables data to be transferred directly between memory-mapped addresses on the PCI device and the host’s RAM, freeing the CPU from involvement in the data transfer and thus improving the host’s performance.

DMA data-buffer sizes are limited only by the size of the host’s RAM and the available memory.

11.2. Performing Direct Memory Access (DMA)

This section describes how to use WinDriver to implement bus-master Direct Memory Access (DMA) for devices capable of acting as bus masters. Such devices have a DMA controller, which the driver should program directly.

DMA is a capability provided by some computer bus architectures — including PCI and PCIe — which allows data to be sent directly from an attached device to the memory on the host, freeing the CPU from involvement with the data transfer and thus improving the host's performance.

A DMA buffer can be allocated in two ways:

  • Contiguous buffer — A contiguous block of memory is allocated.
  • Scatter/Gather — The allocated buffer can be fragmented in the physical memory and does not need to be allocated contiguously. The allocated physical memory blocks are mapped to a contiguous buffer in the calling process's virtual address space, thus enabling easy access to the allocated physical memory blocks.

The programming of a device's DMA controller is hardware specific. Normally, you need to program your device with the local address (on your device), the host address (the physical memory address on your PC) and the transfer count (the size of the memory block to transfer), and then set the register that initiates the transfer.

WinDriver provides you with API for implementing both contiguous-buffer DMA and Scatter/Gather DMA (if supported by the hardware) — see the description of WDC_DMAContigBufLock(), and WDC_DMABufUnlock() .

The following sections include code samples that demonstrate how to use WinDriver to implement Scatter/Gather DMA and contiguous-buffer DMA, and an explanation on how to preallocate contiguous DMA buffers on Windows.

The sample routines demonstrate using either an interrupt mechanism or a polling mechanism to determine DMA completion.

The sample routines allocate a DMA buffer and enable DMA interrupts (if polling is not used) and then free the buffer and disable the interrupts (if enabled) for each DMA transfer. However, when you implement your actual DMA code, you can allocate DMA buffer(s) once, at the beginning of your application, enable the DMA interrupts (if polling is not used), then perform DMA transfers repeatedly, using the same buffer(s), and disable the interrupts (if enabled) and free the buffer(s) only when your application no longer needs to perform DMA.

11.2.1. Implementing Scatter/Gather DMA

Following is a sample routine that uses WinDriver's WDC API to allocate a Scatter/Gather DMA buffer and perform bus-master DMA transfers.

11.2.1.1. C Example

A more detailed example, which is specific to the enhanced support for PLX chipsets can be found in the
WinDriver/samples/c/plx/lib/plx_lib.c library file and
WinDriver/samples/c/plx/diag_lib/plx_diag_lib.c diagnostics library file (which utilizes the plx_lib.c DMA API).

BOOL DMARoutine(WDC_DEVICE_HANDLE hDev, DWORD dwDMABufSize,
UINT32 u32LocalAddr, BOOL fPolling, BOOL fToDev)
{
PVOID pBuf;
WD_DMA *pDma = NULL;
BOOL fRet = FALSE;
/* Allocate a user-mode buffer for Scatter/Gather DMA */
pBuf = malloc(dwDMABufSize);
if (!pBuf)
return FALSE;
/* Lock the DMA buffer and program the DMA controller */
if (!DMAOpen(hDev, pBuf, u32LocalAddr, dwDMABufSize, fToDev, &pDma))
goto Exit;
/* Enable DMA interrupts (if not polling) */
if (!fPolling)
{
if (!MyDMAInterruptEnable(hDev, MyDmaIntHandler, pDma))
goto Exit; /* Failed enabling DMA interrupts */
}
/* Flush the CPU caches (see documentation of WDC_DMASyncCpu()) */
/* Start DMA - write to the device to initiate the DMA transfer */
MyDMAStart(hDev, pDma);
/* Wait for the DMA transfer to complete */
MyDMAWaitForCompletion(hDev, pDma, fPolling);
/* Flush the I/O caches (see documentation of WDC_DMASyncIo()) */
fRet = TRUE;
Exit:
DMAClose(hDev, pDma, fPolling);
free(pBuf);
return fRet;
}
/* DMAOpen: Locks a Scatter/Gather DMA buffer */
BOOL DMAOpen(WDC_DEVICE_HANDLE hDev, PVOID pBuf, UINT32 u32LocalAddr, DWORD dwDMABufSize, BOOL fToDev, WD_DMA **ppDma)
{
DWORD dwStatus, i;
DWORD dwOptions = fToDev ? DMA_TO_DEVICE : DMA_FROM_DEVICE;
/* Lock a Scatter/Gather DMA buffer */
dwStatus = WDC_DMASGBufLock(hDev, pBuf, dwOptions, dwDMABufSize, ppDma);
if (WD_STATUS_SUCCESS != dwStatus)
{
printf("Failed locking a Scatter/Gather DMA buffer. Error 0x%lx - %s\n",
dwStatus, Stat2Str(dwStatus));
return FALSE;
}
/* Program the device's DMA registers for each physical page */
MyDMAProgram((*ppDma)->Page, (*ppDma)->dwPages, fToDev, u32LocalAddr);
return TRUE;
}
/* DMAClose: Unlocks a previously locked Scatter/Gather DMA buffer */
void DMAClose(WDC_DEVICE_HANDLE hDev, WD_DMA *pDma, BOOL fPolling)
{
/* Disable DMA interrupts (if not polling) */
if (!fPolling)
MyDMAInterruptDisable(hDev);
/* Unlock and free the DMA buffer */
}
#define NULL
Definition: kpstdlib.h:268
void *__cdecl malloc(unsigned long size)
#define TRUE
Definition: kpstdlib.h:264
#define FALSE
Definition: kpstdlib.h:260
void __cdecl free(void *buf)
const char *DLLCALLCONV Stat2Str(_In_ DWORD dwStatus)
Retrieves the status string that corresponds to a status code.
DWORD DLLCALLCONV WDC_DMASGBufLock(_In_ WDC_DEVICE_HANDLE hDev, _In_ PVOID pBuf, _In_ DWORD dwOptions, _In_ DWORD dwDMABufSize, _Outptr_ WD_DMA **ppDma)
Locks a pre-allocated user-mode memory buffer for DMA and returns the corresponding physical mappings...
DWORD DLLCALLCONV WDC_DMASyncIo(_In_ WD_DMA *pDma)
Synchronizes the I/O caches with the DMA buffer, by flushing the data from the I/O caches and updatin...
DWORD DLLCALLCONV WDC_DMASyncCpu(_In_ WD_DMA *pDma)
Synchronizes the cache of all CPUs with the DMA buffer, by flushing the data from the CPU caches.
DWORD DLLCALLCONV WDC_DMABufUnlock(_In_ WD_DMA *pDma)
Unlocks and frees the memory allocated for a DMA buffer by a previous call to WDC_DMAContigBufLock(),...
void * WDC_DEVICE_HANDLE
Handle to device information struct.
Definition: wdc_lib.h:33
@ WD_STATUS_SUCCESS
[0] Operation completed successfully
Definition: windrvr.h:1061
@ DMA_TO_DEVICE
memory pages are locked to be read by device
Definition: windrvr.h:454
@ DMA_FROM_DEVICE
memory pages are locked to be written by device
Definition: windrvr.h:451

11.2.1.2. C# Example

A more detailed example, which is specific to the enhanced support for PLX chipsets can be found in the WinDriver/samples/c/plx/dotnet/lib/ library and WinDriver/samples/c/plx/dotnet/diag/ diagnostics library.

bool DMARoutine(PCI_Device dev, DWORD dwDMABufSize, UINT32 u32LocalAddr, bool fPolling, bool fToDev, IntHandler MyDmaIntHandler)
{
bool fRet = false;
IntPtr pBuf = IntPtr.Zero;
Log log = new Log(new Log.TRACE_LOG(TraceLog),
new Log.ERR_LOG(ErrLog));
WD_DMA wdDma = new WD_DMA();
DmaBuffer dmaBuf = new DmaBufferSG(dev, log);
/* Allocate user mode buffer for Scatter/Gather DMA */
pBuf = Marshal.AllocHGlobal((int)dwDMABufSize);
if (pBuf == IntPtr.Zero)
{
fRet = false;
goto Exit;
}
/* Lock the DMA buffer and program the DMA controller */
if (!DMAOpen(ref dmaBuf, pBuf, u32LocalAddr, dwDMABufSize, fToDev, ref wdDma))
{
fRet = false;
goto Exit;
}
/* Enable DMA interrupts (if not polling) */
if (!fPolling)
{
if (!MyDMAInterruptEnable(dev, MyDmaIntHandler, ref wdDma))
{
fRet = false;
goto Exit; /* Failed enabling DMA interrupts */
}
}
/* Flush the CPU caches (see documentation of WDC_DMASyncCpu()) */
wdc_lib_decl.WDC_DMASyncCpu(dmaBuf.pWdDma);
/* Start DMA - write to the device to initiate the DMA transfer */
MyDmaStart(dev, ref wdDma);
/* Wait for the DMA transfer to complete */
MyDMAWaitForCompletion(dev, ref wdDma, fPolling);
/* Flush the I/O caches (see documentation of WDC_DMASyncIo()) */
wdc_lib_decl.WDC_DMASyncIo(dmaBuf.pWdDma);
fRet = true;
Exit:
DMAClose(dev, dmaBuf, fPolling);
if (pBuf != IntPtr.Zero)
Marshal.FreeHGlobal(pBuf);
return fRet;
}
/* OpenDMA: Locks a Scatter/Gather DMA buffer */
public bool DMAOpen(ref DmaBuffer dmaBuf, IntPtr pBuf, UINT32 u32LocalAddr, DWORD bufSize, bool fToDev, ref WD_DMA wdDma)
{
IntPtr pDma = dmaBuf.pWdDma;
WDC_DEVICE_HANDLE hDev = dmaBuf.DeviceHandle;
DWORD dwOptions = fToDev ? (DWORD)WD_DMA_OPTIONS.DMA_TO_DEVICE :
(DWORD)WD_DMA_OPTIONS.DMA_FROM_DEVICE;
wdDma = MarshalDMA(pDma);
/* Lock a Scatter/Gather DMA buffer */
if (wdc_lib_decl.WDC_DMASGBufLock(hDev, pBuf, dwOptions, bufSize, ref pDma) != (DWORD)wdc_err.WD_STATUS_SUCCESS)
return false;
/* Program the device's DMA registers for each physical page */
MyDMAProgram(fToDev, wdDma.Page[0], wdDma.dwPages, u32LocalAddr);
return true;
}
/* DMAClose: Unlocks a previously locked Scatter/Gather DMA buffer */
public void DMAClose(PCI_Device dev, DmaBuffer dmaBuf, bool fPolling)
{
/* Disable DMA interrupts (if not polling) */
if (!fPolling)
MyDMAInterruptDisable(dev);
/* Unlock and free the DMA buffer */
wdc_lib_decl.WDC_DMABufUnlock(dmaBuf.pWdDma);
}
WD_DMA_OPTIONS
Definition: windrvr.h:433

Notice the difference between ref WD_DMA wdDma and IntPtr pWdDma. The former is used by C# user functions, while the latter is used by WDC API C functions, that can only take a pointer, not a reference.

11.2.1.3. What Should You Implement?

In the code sample above, it is up to you to implement the following MyDMAxxx() routines, according to your device's specification:

  • MyDMAProgram(): Program the device's DMA registers. Refer the device's data sheet for the details.
  • MyDMAStart(): Write to the device to initiate DMA transfers.
  • MyDMAInterruptEnable() and MyDMAInterruptDisable(): Use WDC_IntEnable() / WDC_IntDisable() (respectively) to enable/disable the software interrupts and write/read the relevant register(s) on the device in order to physically enable/disable the hardware DMA interrupts
    (see 11.3. Performing Direct Memory Access (DMA) transactions for details regarding interrupt handling with WinDriver.)
  • MyDMAWaitForCompletion(): Poll the device for completion or wait for "DMA DONE" interrupt.
  • MyDmaIntHandler: The device's interrupt handler. IntHandler is a pointer to a function prototype of your choice.

When using the basic WD_xxx API to allocate a Scatter/Gather DMA buffer that is larger than 1MB, you need to set the DMA_LARGE_BUFFER flag in the call to WD_DMALock() and allocate memory for the additional memory pages.

However, when using WDC_DMASGBufLock() to allocate the DMA buffer, you do not need any special implementation for allocating large buffers, since the function handles this for you.

11.2.2. Implementing Contiguous-Buffer DMA

Following is a sample routine that uses WinDriver's WDC API to allocate a contiguous DMA buffer and perform bus-master DMA transfers.

For more detailed, hardware-specific, contiguous DMA examples, refer to the following enhanced-support chipset sample library files:

  • PLX — WinDriver/samples/c/plx/lib/plx_lib.c and
    WinDriver/samples/c/plx/diag_lib/plx_diag_lib.c
    (which utilizes the plx_lib.c DMA API)
  • Xilinx Bus Master DMA (BMD) design — WinDriver/samples/c/xilinx/bmd_design/bmd_lib.c

11.2.2.1. C Example

BOOL DMARoutine(WDC_DEVICE_HANDLE hDev, DWORD dwDMABufSize,
UINT32 u32LocalAddr, BOOL fPolling, BOOL fToDev)
{
PVOID pBuf = NULL;
WD_DMA *pDma = NULL;
BOOL fRet = FALSE;
/* Allocate a DMA buffer and open DMA for the selected channel */
if (!DMAOpen(hDev, &pBuf, u32LocalAddr, dwDMABufSize, fToDev, &pDma))
goto Exit;
/* Enable DMA interrupts (if not polling) */
if (!fPolling)
{
if (!MyDMAInterruptEnable(hDev, MyDmaIntHandler, pDma))
goto Exit; /* Failed enabling DMA interrupts */
}
/* Flush the CPU caches (see documentation of WDC_DMASyncCpu()) */
/* Start DMA - write to the device to initiate the DMA transfer */
MyDMAStart(hDev, pDma);
/* Wait for the DMA transfer to complete */
MyDMAWaitForCompletion(hDev, pDma, fPolling);
/* Flush the I/O caches (see documentation of WDC_DMASyncIo()) */
fRet = TRUE;
Exit:
DMAClose(hDev, pDma, fPolling);
return fRet;
}
/* DMAOpen: Allocates and locks a contiguous DMA buffer */
BOOL DMAOpen(WDC_DEVICE_HANDLE hDev, PVOID *ppBuf, UINT32 u32LocalAddr,
DWORD dwDMABufSize, BOOL fToDev, WD_DMA **ppDma)
{
DWORD dwStatus;
DWORD dwOptions = fToDev ? DMA_TO_DEVICE : DMA_FROM_DEVICE;
/* Allocate and lock a contiguous DMA buffer */
dwStatus = WDC_DMAContigBufLock(hDev, ppBuf, dwOptions, dwDMABufSize, ppDma);
if (WD_STATUS_SUCCESS != dwStatus)
{
printf("Failed locking a contiguous DMA buffer. Error 0x%lx - %s\n",
dwStatus, Stat2Str(dwStatus));
return FALSE;
}
/* Program the device's DMA registers for the physical DMA page */
MyDMAProgram((*ppDma)->Page, (*ppDma)->dwPages, fToDev, u32LocalAddr);
return TRUE;
}
/* DMAClose: Frees a previously allocated contiguous DMA buffer */
void DMAClose(WDC_DEVICE_HANDLE hDev, WD_DMA *pDma, BOOL fPolling)
{
/* Disable DMA interrupts (if not polling) */
if (!fPolling)
MyDMAInterruptDisable(hDev);
/* Unlock and free the DMA buffer */
}
DWORD DLLCALLCONV WDC_DMAContigBufLock(_In_ WDC_DEVICE_HANDLE hDev, _Outptr_ PVOID *ppBuf, _In_ DWORD dwOptions, _In_ DWORD dwDMABufSize, _Outptr_ WD_DMA **ppDma)
Allocates a contiguous DMA buffer, locks it in physical memory, and returns mappings of the allocated...

11.2.2.2. C# Example

bool DMARoutine(PCI_Device dev, DWORD dwDMABufSize, UINT32 u32LocalAddr,
bool fPolling, bool fToDev, IntHandler MyDmaIntHandler)
{
bool fRet = false;
IntPtr pBuf = IntPtr.Zero;
Log log = new Log(new Log.TRACE_LOG(TraceLog),
new Log.ERR_LOG(ErrLog));
WD_DMA wdDma = new WD_DMA();
DmaBuffer dmaBuf = new DmaBufferContig(dev, log);
/* Lock the DMA buffer and program the DMA controller */
if (!DMAOpen(ref dmaBuf, pBuf, u32LocalAddr, dwDMABufSize,
fToDev, ref wdDma))
{
fRet = false;
goto Exit;
}
/* Enable DMA interrupts (if not polling) */
if (!fPolling)
{
if (!MyDMAInterruptEnable(dev, MyDmaIntHandler, ref wdDma))
{
fRet = false;
goto Exit; /* Failed enabling DMA interrupts */
}
}
/* Flush the CPU caches (see documentation of WDC_DMASyncCpu()) */
wdc_lib_decl.WDC_DMASyncCpu(dmaBuf.pWdDma);
/* Start DMA - write to the device to initiate the DMA transfer */
MyDmaStart(dev, ref wdDma);
/* Wait for the DMA transfer to complete */
MyDMAWaitForCompletion(dev, ref wdDma, fPolling);
/* Flush the I/O caches (see documentation of WDC_DMASyncIo()) */
wdc_lib_decl.WDC_DMASyncIo(dmaBuf.pWdDma);
fRet = true;
Exit:
DMAClose(dev, dmaBuf, fPolling);
return fRet;
}
/* OpenDMA: Locks a Contiguous DMA buffer */
public bool DMAOpen(ref DmaBuffer dmaBuf, IntPtr pBuf, UINT32 u32LocalAddr,
DWORD bufSize, bool fToDev, ref WD_DMA wdDma)
{
IntPtr pDma = dmaBuf.pWdDma;
WDC_DEVICE_HANDLE hDev = dmaBuf.DeviceHandle;
DWORD dwOptions = fToDev ? (DWORD)WD_DMA_OPTIONS.DMA_TO_DEVICE :
(DWORD)WD_DMA_OPTIONS.DMA_FROM_DEVICE;
wdDma = MarshalDMA(pDma);
/* Lock a Scatter/Gather DMA buffer */
if (wdc_lib_decl.WDC_DMAContigBufLock(hDev, ref pBuf, dwOptions,
bufSize, ref pDma) != (DWORD)wdc_err.WD_STATUS_SUCCESS)
return false;
/* Program the device's DMA registers for each physical page */
MyDMAProgram(fToDev, wdDma.Page[0], wdDma.dwPages, u32LocalAddr);
return true;
}
/* DMAClose: Unlocks a previously locked Scatter/Gather DMA buffer */
public void DMAClose(PCI_Device dev, DmaBuffer dmaBuf, bool fPolling)
{
/* Disable DMA interrupts (if not polling) */
if (!fPolling)
MyDMAInterruptDisable(dev);
/* Unlock and free the DMA buffer */
wdc_lib_decl.WDC_DMABufUnlock(dmaBuf.pWdDma);
}

11.2.2.3. What Should You Implement?

In the code sample above, it is up to you to implement the following MyDMAxxx() routines, according to your device's specification:

  • MyDMAProgram(): Program the device's DMA registers. Refer the device's data sheet for the details.
  • MyDMAStart(): Write to the device to initiate DMA transfers.
  • MyDMAInterruptEnable() and MyDMAInterruptDisable(): Use WDC_IntEnable() / WDC_IntDisable() (respectively) to enable/disable the software interrupts and write/read the relevant register(s) on the device in order to physically enable/disable the hardware DMA interrupts
    (see 11.3. Performing Direct Memory Access (DMA) transactions for details regarding interrupt handling with WinDriver.)
  • MyDMAWaitForCompletion(): Poll the device for completion or wait for "DMA DONE" interrupt.
  • MyDmaIntHandler: The device's interrupt handler. IntHandler is a pointer to a function prototype of your choice.

11.2.2.4. Preallocating Contiguous DMA Buffers on Windows

WinDriver doesn't limit the size of the DMA buffer that can be allocated using its DMA APIs. However, the success of the DMA allocation is dependent on the amount of available system resources at the time of the allocation. Therefore, the earlier you try to allocate the buffer, the better your chances of succeeding.

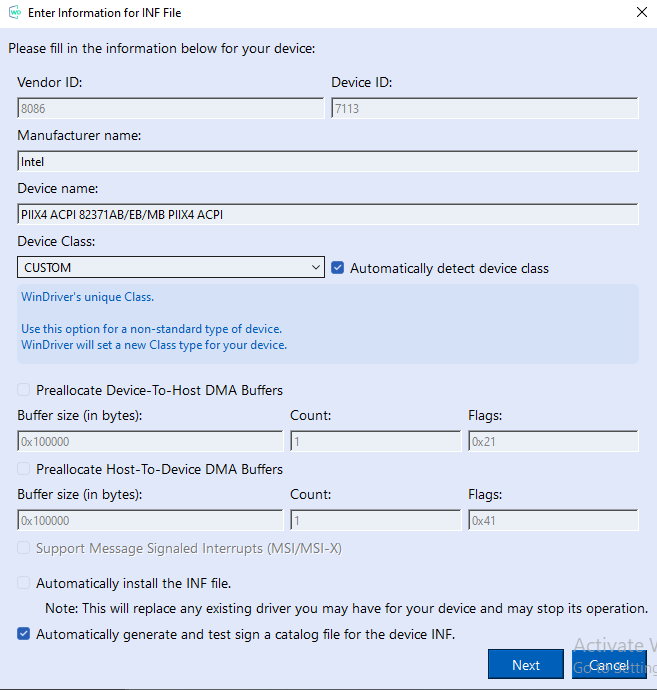
WinDriver for Windows allows you to configure your device INF file to preallocate contiguous DMA buffers at boot time, thus increasing the odds that the allocation(s) will succeed. You may preallocate a maximum of 512 buffers: — 256 host-to-device buffers and/or 256 device-to-host buffers.

There are 2 ways to preallocate contiguous DMA buffers on Windows: directly from the DriverWizard, or manually via editing the INF file.

Directly from DriverWizard:

  • In DriverWizard, start a new project, select a device from the list and click Generate .INF file.
  • Check Preallocate Host-To-Device DMA Buffers and/or Preallocate Device-To-Host DMA Buffers to enable the text boxes under each checkbox.
  • Adjust the Size, Count and Flags parameters as desired. The supported WinDriver DMA flags are documented in the WD_DMA_OPTIONS enum.
  • Click Next, and you will then be prompted to choose a filename for your .INF file. After choosing a filename, the INF file will be created and ready to use, with your desired parameters.

⚠ Attention

The Size and Flags fields must be hexadecimal numbers, formatted with the "0x" prefix, as shown below.

DriverWizard INF File Information

Manually by editing an existing INF file:

  • Add the required configuration under the UpdateRegistryDevice registry key in your device INF file, as shown below.

The examples are for configuring preallocation of eight DMA buffers but you may, of-course, select to preallocate just one buffer (or none at all). To preallocate unidirectional buffers, add these lines:

; Host-to-device DMA buffer:
HKR,, "DmaToDeviceCount",0x00010001,0x04 ; Number of preallocated
; DMA_TO_DEVICE buffers
HKR,, "DmaToDeviceBytes",0x00010001,0x100000 ; Buffer size, in bytes
HKR,, "DmaToDeviceOptions",0x00010001,0x41 ; DMA flags (0x40=DMA_TO_DEVICE
; + 0x1=DMA_KERNEL_BUFFER_ALLOC
; Device-to-host DMA buffer:
HKR,, "DmaFromDeviceCount",0x00010001,0x04 ; Number of preallocated
; DMA_FROM_DEVICE buffers
HKR,, "DmaFromDeviceBytes",0x00010001,0x100000 ; Buffer size, in bytes
HKR,, "DmaFromDeviceOptions",0x00010001,0x21 ; DMA flags (0x20=DMA_FROM_DEVICE
; + 0x1=DMA_KERNEL_BUFFER_ALLOC)
  • Edit the buffer sizes and add flags to the options masks in the INF file, as needed. Note, however, that the direction flags and the DMA_KERNEL_BUFFER_ALLOC flag must be set as shown in Step 1.

The supported WinDriver DMA flags for the dwOptions field of the WD_DMA struct are documented in WD_DMA_OPTIONS.

DmaFromDeviceCount and DmaFromDeviceCount values are supported from version 12.4.0. If those values aren’t set value of 1 will be assumed.

The Wizard-generated and relevant sample WinDriver device INF files already contain the unidirectional buffers configuration lines, so you only need to remove the comment indicator ; at the start of each line. The examples are for configuring preallocation of 8 DMA buffers (4 for each direction), but you may, of-course, select to preallocate just one buffer (or none at all, by leaving the above code commented out).

In your code, the first n calls (if you configured the INF file to preallocate n DMA buffers) to the contiguous-DMA-lock function — WDC_DMAContigBufLock() — should set parameter values that match the buffer configurations in the INF file:

⚠ Attention

For a device-to-host buffer, the DMA-options mask parameter (dwOptions / pDma->dwOptions) should contain the same DMA flags set in the DmaFromDeviceOptions registry key value, and the buffer-size parameter (dwDMABufSize / pDma->dwBytes) should be set to the value of the DmaFromDeviceBytes registry key value. For a host-to-device buffer, the DMA-options mask parameter (dwOptions / pDma->dwOptions) should contain the same flags set in the DmaToDeviceOptions registry key value, and the buffer-size parameter (dwDMABufSize / pDma->dwBytes) should be set to the value of the DmaToDeviceBytes registry key value.

In calls to WDC_DMAContigBufLock(), the DMA configuration information is provided via dedicated function parameters — dwDMABufSize and dwOptions. In calls to WD_DMALock(), the information is provided within the fields of the WD_DMA struct pointed to by the pDma parameter — pDma->dwBytes and pDma->dwOptions.

When using WDC_DMAContigBufLock() you don't need to explicitly set the DMA_KERNEL_BUFFER_ALLOC flag (which must be set in the INF-file configuration) because the function sets this flag automatically.

When using the low-level WinDriver WD_DMALock() function, the DMA options are set in the function's pDma->dwOptions parameter — which must also include the DMA_KERNEL_BUFFER_ALLOC flag — and the buffer size is set in the pDma->dwBytes parameter.

If the buffer preallocation fails due to insufficient resources, you may need to increase the size of the non-paged pool (from which the memory is allocated).

11.3. Performing Direct Memory Access (DMA) transactions

This section describes how to use WinDriver to implement bus-master Direct Memory Access (DMA) transactions for devices capable of acting as bus masters. Such devices have a DMA controller, which the driver should program directly.

DMA is a capability provided by some computer bus architectures — including PCI and PCIe — which allows data to be sent directly from an attached device to the memory on the host, freeing the CPU from involvement with the data transfer and thus improving the host's performance.

To understand the use of WinDriver's DMA transaction API, you must be familiar with the following concepts:

DMA transaction

A DMA transaction is a complete I/O operation, such as a single read or write request from an application.

DMA transfer

A DMA transfer is a single hardware operation that transfers data from computer memory to a device or from the device to computer memory.

A single DMA transaction always consists of at least one DMA transfer, but a transaction can consist of many transfers.

A DMA transaction buffer can be allocated in two ways:

  • Contiguous buffer — A contiguous block of memory is allocated.
  • Scatter/Gather (SG) — The allocated buffer can be fragmented in the physical memory and does not need to be allocated contiguously. The allocated physical memory blocks are mapped to a contiguous buffer in the calling process's virtual address space, thus enabling easy access to the allocated physical memory blocks.

The programming of a device's DMA controller is hardware specific. Normally, you need to program your device with the local address (on your device), the host address (the physical memory address on your PC) and the transfer count (the size of the memory block to transfer), and then set the register that initiates the transfer. WinDriver provides you with an API for implementing both Contiguous-Buffer DMA transactions and Scatter/Gather DMA transactions (if supported by the hardware) — see the description of WDC_DMATransactionContigInit(), WDC_DMATransactionSGInit(), WDC_DMATransferCompletedAndCheck(), WDC_DMATransactionRelease() and WDC_DMATransactionUninit().

DMA transaction diagram

The following sections include code samples that demonstrate how to use WinDriver to implement a Scatter/Gather DMA transaction (see 11.2.1. Implementing Scatter/Gather DMA) and a Contiguous-Buffer DMA transaction (see 11.2.2. Implementing Contiguous-Buffer DMA).

The sample routines demonstrate using either an interrupt mechanism or a polling mechanism to determine DMA completion.

11.3.1. Implementing Scatter/Gather DMA transactions

Following is a sample routine that uses WinDriver's WDC API to initialize a Scatter/Gather DMA transaction buffer and perform bus-master DMA transfers.

For more detailed, hardware-specific, Scatter Gather DMA transaction examples, refer to the following enhanced-support chipset (Chapter 9: Enhanced Support for Specific Chipsets) sample library files:

  • PLX — WinDriver/samples/c/plx/lib/plx_lib.c, WinDriver/samples/c/plx/diag_lib/plx_diag_lib.c (which utilizes the plx_lib.c DMA API) and WinDriver/samples/c/plx/9656/p9656_diag.c
  • XDMA design — WinDriver/samples/c/xilinx/xdma/xdma_lib.c

11.3.1.1. C Example

#define MAX_TRANSFER_SIZE 0xFFFF /* According to the device limits */
typedef struct {
UINT32 u32PADR; /* PCI address */
UINT32 u32LADR; /* Local address */
UINT32 u32SIZ; /* Transfer size */
UINT32 u32DPR; /* Next descriptor pointer */
} MY_DMA_TRANSFER_ELEMENT; /* DMA transfer element */
BOOL DMATransactionRoutine(WDC_DEVICE_HANDLE hDev, DWORD dwDMABufSize,
UINT32 u32LocalAddr, BOOL fPolling, BOOL fToDev)
{
PVOID pBuf;
WD_DMA *pDma = NULL;
BOOL fRet = FALSE;
/* Allocate a user-mode buffer for a Scatter/Gather DMA transaction */
pBuf = malloc(dwDMABufSize);
if (!pBuf)
return FALSE;
/* Initialize the DMA transaction */
if (!DMATransactionInit(hDev, pBuf, u32LocalAddr, dwDMABufSize, fToDev, &pDma,
fPolling))
{
goto Exit;
}
if (!DMATransactionExecute(hDev, pDma, fPolling))
{
goto Exit;
}
/* Wait for the DMA transaction to complete */
MyDMAWaitForCompletion(hDev, pDma, fPolling);
if (!DMATransactionRelease(hDev, pDma))
{
goto Exit;
}
/* The DMA transaction can be reused as many times as you like
* Notice: after each call to DMATransactionExecute
* (WDC_DMATransactionExecute) there must be a call to
* DMATransactionRelease (WDC_DMATransactionRelease) */
fRet = TRUE;
Exit:
DMAClose(hDev, pDma, fPolling);
free(pBuf);
return fRet;
}
/* DMATransactionInit: Initializes a Scatter/Gather DMA transaction buffer */
BOOL DMATransactionInit(WDC_DEVICE_HANDLE hDev, PVOID pBuf, UINT32 u32LocalAddr,
DWORD dwDMABufSize, BOOL fToDev, WD_DMA **ppDma, BOOL fPolling)
{
DWORD dwStatus, dwNumCmds, i;
DWORD dwOptions = fToDev ? DMA_TO_DEVICE : DMA_FROM_DEVICE;
WD_TRANSFER *pTrans;
WDC_INTERRUPT_PARAMS interruptsParams;
BOOL fRet = FALSE;
/* Enable DMA interrupts (if not polling) */
if (!fPolling)
{
pTrans = GetMyTransCmds(&dwNumCmds);
interruptsParams.pTransCmds = pTrans;
interruptsParams.dwNumCmds = dwNumCmds;
interruptsParams.dwOptions = INTERRUPT_CMD_COPY;
interruptsParams.funcIntHandler = MyDmaIntHandler;
interruptsParams.pData = hDev;
interruptsParams.fUseKP = FALSE;
}
/* Initialize a Scatter/Gather DMA transaction buffer */
dwStatus = WDC_DMATransactionSGInit(hDev, pBuf, dwOptions, dwDMABufSize,
ppDma, &interruptsParams, MAX_TRANSFER_SIZE,
sizeof(MY_DMA_TRANSFER_ELEMENT));
if (WD_STATUS_SUCCESS != dwStatus)
{
printf("Failed to initialize a Scatter/Gather DMA transaction buffer. Error "
"0x%lx - %s\n", dwStatus, Stat2Str(dwStatus));
goto Exit;
}
fRet = TRUE;
Exit:
return fRet;
}
/* DMATransactionExecute: Executes the DMA transaction */
BOOL DMATransactionExecute(WDC_DEVICE_HANDLE hDev, WD_DMA *pDma, BOOL fPolling)
{
BOOL fRet = FALSE;
DWORD dwPage;
UINT64 u64Offset;
dwStatus = WDC_DMATransactionExecute(pDma, DMATransactionProgram, hDev);
if (dwStatus != WD_STATUS_SUCCESS)
{
printf("Failed to execute DMA transaction. Error 0x%lx - %s\n",
dwStatus, Stat2Str(dwStatus));
goto Exit;
}
fRet = TRUE;
Exit:
return fRet;
}
/* DMATransactionProgram: Programs the device's DMA registers and starts the
* DMA */
void DMATransactionProgram(WDC_DEVICE_HANDLE hDev)
{
PDEV_CTX pDevCtx = (PDEV_CTX)WDC_GetDevContext(hDev);
WD_DMA *pDma = pDevCtx->pDma;
BOOL fToDev = pDevCtx->fToDev;
DWORD dwPage;
UINT64 u64Offset;
/* The value of u64Offset is the required offset on the device */
u64Offset = pDevCtx->u32LocalAddr + pDma->dwBytesTransferred;
for (dwPage = 0; dwPage < pDma->dwPages; dwPage++)
{
/* Use pDma->Page array, u64Offset, fToDev,...
* to program the device's DMA registers for each physical page */
u64Offset += pDma->Page[dwPage].dwBytes;
}
/* Enable interrupts on hardware */
MyDMAInterruptHardwareEnable(hDev);
/* Start DMA - write to the device to start the DMA transfer */
MyDMAStart(hDev, pDma);
}
/* MyDmaIntHandler: Interrupt handler */
void DLLCALLCONV MyDmaIntHandler(PVOID pData)
{
PDEV_CTX pDevCtx = (PDEV_CTX)WDC_GetDevContext(hDev);
WD_DMA *pDma = pDevCtx->pDma;
DWORD dwStatus;
if (dwStatus == WD_STATUS_SUCCESS)
{
/* DMA transaction completed */
}
else if (dwStatus != WD_MORE_PROCESSING_REQUIRED)
{
/* DMA transfer failed */
}
else /* dwStatus == WD_MORE_PROCESSING_REQUIRED */
{
/* DMA transfer completed (but the transaction is not completed) */
/* If the fRunCallback parameter given to
* WDC_DMATransferCompletedAndCheck() is TRUE, then the
* DMATransactionProgram function is automatically called
* synchronously by WDC_DMATransferCompletedAndCheck */
}
}
/* DMATransactionRelease: Releases the DMA transaction */
BOOL DMATransactionRelease(WD_DMA *pDma)
{
DWORD dwStatus = WDC_DMATransactionRelease(pDma);
return (dwStatus == WD_STATUS_SUCCESS) ? TRUE : FALSE;
}
/* DMAClose: Deletes a previously initiated Scatter/Gather DMA transaction */
void DMAClose(WDC_DEVICE_HANDLE hDev, WD_DMA *pDma, BOOL fPolling)
{
/* Disable DMA interrupts (if not polling) */
if (!fPolling)
MyDMAInterruptDisable(hDev);
}
INT_HANDLER funcIntHandler
Definition: wdc_lib.h:1501
WD_TRANSFER * pTransCmds
Definition: wdc_lib.h:1498
DWORD dwBytes
Size of page.
Definition: windrvr.h:522
DWORD dwBytesTransferred
bytes transferred count
Definition: windrvr.h:556
WD_DMA_PAGE Page[WD_DMA_PAGES]
Definition: windrvr.h:558
DWORD dwPages
Number of pages in buffer.
Definition: windrvr.h:541
DWORD DLLCALLCONV WDC_DMATransactionUninit(_In_ WD_DMA *pDma)
Unlocks and frees the memory allocated for a DMA buffer transaction by a previous call to WDC_DMATran...
DWORD DLLCALLCONV WDC_DMATransactionSGInit(_In_ WDC_DEVICE_HANDLE hDev, _In_ PVOID pBuf, _In_ DWORD dwOptions, _In_ DWORD dwDMABufSize, _Outptr_ WD_DMA **ppDma, _In_ WDC_INTERRUPT_PARAMS *pInterruptParams, _In_ DWORD dwMaxTransferSize, _In_ DWORD dwTransferElementSize)
Initializes the transaction and locks a pre-allocated user-mode memory buffer for DMA.
DWORD DLLCALLCONV WDC_DMATransactionRelease(_In_ WD_DMA *pDma)
Terminates a specified DMA transaction without deleting the associated WD_DMA transaction structure.
DWORD DLLCALLCONV WDC_DMATransactionExecute(_Inout_ WD_DMA *pDma, _In_ DMA_TRANSACTION_CALLBACK funcDMATransactionCallback, _In_ PVOID DMATransactionCallbackCtx)
Begins the execution of a specified DMA transaction.
PVOID DLLCALLCONV WDC_GetDevContext(_In_ WDC_DEVICE_HANDLE hDev)
Returns the device's user context information.
DWORD DLLCALLCONV WDC_DMATransferCompletedAndCheck(_Inout_ WD_DMA *pDma, _In_ BOOL fRunCallback)
Notifies WinDriver that a device's DMA transfer operation is completed.
@ WD_MORE_PROCESSING_REQUIRED
[0xC0000016] More Processing Required.
Definition: windrvr.h:1250
@ INTERRUPT_CMD_COPY
Copy any data read in the kernel as a result of a read transfer command, and return it to the user wi...
Definition: windrvr.h:607
#define DLLCALLCONV
Definition: windrvr.h:32

11.3.1.2. C# Example

A detailed example, which is specific to the enhanced support for PLX chipsets can be found in the WinDriver/samples/c/plx/dotnet/lib/ library and WinDriver/samples/c/plx/dotnet/diag/ diagnostics library.

11.3.1.3. What Should You Implement?

In the code sample above, it is up to you to implement the following MyDMAxxx() routines and MY_DMA_TRANSFER_ELEMENT structure according to your device's specification and your needs:

  • MY_DMA_TRANSFER_ELEMENT: A DMA transfer element structure according to your device's specification.
  • MyDMAStart(): Write to the device to initiate DMA transfers.
  • MyDMAInterruptHardwareEnable(): Write/read the relevant register(s) on the device in order to physically enable the hardware DMA interrupts (see Section 10.4 for details regarding interrupt handling with WinDriver).
  • MyDMAInterruptDisable(): Use WDC_IntDisable() to disable the software interrupts and write/read the relevant register(s) on the device in order to physically disable the hardware DMA interrupts (see Section 11.4 for details regarding interrupt handling with WinDriver).
  • MyDMAWaitForCompletion(): Poll the device for completion or wait for a "DMA transfer done" interrupt.
  • MyDmaIntHandler: The device's interrupt handler. IntHandler is a pointer to a function prototype of your choice.

11.3.2. Implementing Contiguous-Buffer DMA transactions

Following is a sample routine that uses WinDriver's WDC API to initialize a Contiguous- Buffer DMA transaction and perform bus-master DMA transfers.

For more detailed, hardware-specific, contiguous DMA examples, refer to the following enhanced-support chipset sample library files:

  • PLX — WinDriver/samples/c/plx/lib/plx_lib.c and WinDriver/samples/c/plx/diag_lib/plx_diag_lib.c (which utilizes the plx_lib.c DMA API)
  • XDMA design — WinDriver/samples/c/xilinx/xdma/xdma_lib.c

11.3.2.1. C Example

#define DMA_ALIGNMENT_REQUIREMENT 0xFF /* According to the device requirements */
BOOL DMATransactionRoutine(WDC_DEVICE_HANDLE hDev, DWORD dwDMABufSize,
UINT32 u32LocalAddr, BOOL fPolling, BOOL fToDev)
{
PVOID pBuf = NULL;
WD_DMA *pDma = NULL;
BOOL fRet = FALSE;
/* Initialize the DMA transaction */
if (!DMATransactionInit(hDev, &pBuf, u32LocalAddr, dwDMABufSize, fToDev,
&pDma, fPolling))
{
goto Exit;
}
if (!DMATransactionExecute(hDev, pDma, fPolling))
{
goto Exit;
}
/* Wait for the DMA transaction to complete */
MyDMAWaitForCompletion(hDev, pDma, fPolling);
if (!DMATransactionRelease(hDev, pDma))
{
goto Exit;
}
/* The DMA transaction can be reused as many times as you like
* Notice: after each call to DMATransactionExecute
* (WDC_DMATransactionExecute) there must be a call to
* DMATransactionRelease (WDC_DMATransactionRelease) */
fRet = TRUE;
Exit:
DMAClose(hDev, pDma, fPolling);
free(pBuf);
return fRet;
}
/* DMATransactionInit: Initializes a Contiguous-Buffer DMA transaction buffer */
BOOL DMATransactionInit(WDC_DEVICE_HANDLE hDev, PVOID *ppBuf, UINT32 u32LocalAddr,
DWORD dwDMABufSize, BOOL fToDev, WD_DMA **ppDma, BOOL fPolling)
{
DWORD dwStatus, dwNumCmds, i;
DWORD dwOptions = fToDev ? DMA_TO_DEVICE : DMA_FROM_DEVICE;
WD_TRANSFER *pTrans;
WDC_INTERRUPT_PARAMS interruptsParams;
BOOL fRet = FALSE;
/* Enable DMA interrupts (if not polling) */
if (!fPolling)
{
pTrans = GetMyTransCmds(&dwNumCmds);
interruptsParams.pTransCmds = pTrans;
interruptsParams.dwNumCmds = dwNumCmds;
interruptsParams.dwOptions = INTERRUPT_CMD_COPY;
interruptsParams.funcIntHandler = MyDmaIntHandler;
interruptsParams.pData = hDev;
interruptsParams.fUseKP = FALSE;
}
/* Initialize a Contiguous-Buffer DMA transaction buffer */
dwStatus = WDC_DMATransactionContigInit(hDev, ppBuf, dwOptions, dwDMABufSize,
ppDma, &interruptsParams, DMA_ALIGNMENT_REQUIREMENT);
if (WD_STATUS_SUCCESS != dwStatus)
{
printf("Failed to initialize a Contiguous-Buffer DMA transaction buffer. Error "
"0x%lx - %s\n", dwStatus, Stat2Str(dwStatus));
goto Exit;
}
fRet = TRUE;
Exit:
return fRet;
}
/* DMATransactionExecute: Executes the DMA transaction */
BOOL DMATransactionExecute(WDC_DEVICE_HANDLE hDev, WD_DMA *pDma, BOOL fPolling)
{
BOOL fRet = FALSE;
DWORD dwPage;
UINT64 u64Offset;
dwStatus = WDC_DMATransactionExecute(pDma, DMATransactionProgram, hDev);
if (dwStatus != WD_STATUS_SUCCESS)
{
printf("Failed to execute DMA transaction. Error 0x%lx - %s\n",
dwStatus, Stat2Str(dwStatus));
goto Exit;
}
fRet = TRUE;
Exit:
return fRet;
}
/* DMATransactionProgram: Programs the device's DMA registers and starts the
* DMA */
void DMATransactionProgram(WDC_DEVICE_HANDLE hDev)
{
PDEV_CTX pDevCtx = (PDEV_CTX)WDC_GetDevContext(hDev);
WD_DMA *pDma = pDevCtx->pDma;
BOOL fToDev = pDevCtx->fToDev;
UINT64 u64Offset;
/* The value of u64Offset is the required offset on the device */
u64Offset = pDevCtx->u32LocalAddr + pDma->dwBytesTransferred;
/* Use pDma->Page[0], u64Offset, fToDev,...
* to program the device's DMA registers */
/* Enable interrupts on hardware */
MyDMAInterruptHardwareEnable(hDev);
/* Start DMA - write to the device to start the DMA transfer */
MyDMAStart(hDev, pDma);
}
/* MyDmaIntHandler: Interrupt handler */
void DLLCALLCONV MyDmaIntHandler(PVOID pData)
{
PDEV_CTX pDevCtx = (PDEV_CTX)WDC_GetDevContext(hDev);
WD_DMA *pDma = pDevCtx->pDma;
DWORD dwStatus;
if (dwStatus == WD_STATUS_SUCCESS)
{
/* DMA transaction completed */
}
else if (dwStatus == WD_MORE_PROCESSING_REQUIRED)
{
/* DMA transfer completed (but the transaction is not completed) */
/* If the fRunCallback parameter given to
* WDC_DMATransferCompletedAndCheck() is TRUE, then the
* DMATransactionProgram function is automatically called
* synchronously by WDC_DMATransferCompletedAndCheck */
}
else
{
/* DMA transfer failed */
}
}
/* DMATransactionRelease: Releases the DMA transaction */
BOOL DMATransactionRelease(WD_DMA *pDma)
{
DWORD dwStatus = WDC_DMATransactionRelease(pDma);
return (dwStatus == WD_STATUS_SUCCESS) ? TRUE : FALSE;
}
/* DMAClose: Deletes a previously initiated Contiguous-Buffer DMA transaction */
void DMAClose(WDC_DEVICE_HANDLE hDev, WD_DMA *pDma, BOOL fPolling)
{
/* Disable DMA interrupts (if not polling) */
if (!fPolling)
MyDMAInterruptDisable(hDev);
}
DWORD DLLCALLCONV WDC_DMATransactionContigInit(_In_ WDC_DEVICE_HANDLE hDev, _Outptr_ PVOID *ppBuf, _In_ DWORD dwOptions, _In_ DWORD dwDMABufSize, _Outptr_ WD_DMA **ppDma, _In_ WDC_INTERRUPT_PARAMS *pInterruptParams, _In_ DWORD dwAlignment)
Initializes the transaction, allocates a contiguous DMA buffer, locks it in physical memory,...

11.3.2.2. C# Example

A detailed example, which is specific to the enhanced support for PLX chipsets can be found in the WinDriver/samples/c/plx/dotnet/lib/ library and WinDriver/samples/c/plx/dotnet/diag/ diagnostics library.

11.3.2.3 What Should You Implement?

In the code sample above, it is up to you to implement the following MyDMAxxx() routines and MY_DMA_TRANSFER_ELEMENT structure according to your device's specification and your needs:

  • MY_DMA_TRANSFER_ELEMENT: DMA transfer element structure according to your device's specification.
  • MyDMAStart(): Write to the device to initiate DMA transfers.
  • MyDMAInterruptHardwareEnable(): Write/read the relevant register(s) on the device in order to physically enable the hardware DMA interrupts (see Section 11.4 for details regarding interrupt handling with WinDriver).
  • MyDMAInterruptDisable(): Use WDC_IntDisable() to disable the software interrupts and write/read the relevant register(s) on the device in order to physically disable the hardware DMA interrupts (see Section 11.4 for details regarding interrupt handling with WinDriver).
  • MyDMAWaitForCompletion(): Poll the device for completion or wait for a "DMA transfer done" interrupt.
  • MyDmaIntHandler: The device's interrupt handler. IntHandler is a pointer to a function prototype of your choice.

11.4. DMA between PCI devices and NVIDIA GPUs with GPUDirect (Linux only)

11.4.1. What is GPUDirect for RDMA?

GPUDirect for RDMA is a feature available on selected NVIDIA GPUs that allows performing Direct Memory Access (DMA) between GPUs and PCI Express devices. Check out NVIDIA’s website to make sure your GPU does support GPUDirect for this purpose.

NVIDIA GPUDirect RDMA is currently supported only on Linux. We strive to add support for further GPUs and OSes in the future, please contact WinDr.nosp@m.iver.nosp@m.@jung.nosp@m.o.co.nosp@m.m for further inquiries and suggestions.

11.4.2. System Requirements

The following system requirements:

  • NVIDIA GPU that supports GPUDirect.
  • PCIe device controlled by WinDriver.

11.4.3. Software Prerequisites

The following software prerequisities:

  • Installed NVIDIA kernel drivers for your GPU.
  • Installed CUDA version that supports GPUDirect (we have tested with version 10) along with the NVCC compiler.

11.4.4. WinDriver installation

Unpack WinDriver from the tar file.

cd WinDriver/redist

Make sure your WinDriver kernel module is linked with NVIDIA’s kernel module to allow GPUDIRECT.

./configure –with-gpudirect-source=<<YOUR_NVIDIA_KERNEL_SOURCE_DIRECTORY>>/kernel
sudo make && sudo make install

11.4.5. Moving DMA from CPU to GPU

We strongly recommend making sure you have already implemented and tested a “regular” DMA routine between your device and the computer RAM before moving on to implementing a GPUDirect DMA routine.
See previous sections for more info (11.2. Performing Direct Memory Access (DMA) or
11.3. Performing Direct Memory Access (DMA) transactions).

Assuming you have already implemented a DMA routine in your WinDriver-based code, perform the following steps to perform DMA to the GPU memory instead of the main memory.

11.4.6. Modify Compilation

If compiling using Make/CMake, follow this instructions and see a detailed example below:

  • Change your makefile to compile your app with the CUDA compiler (nvcc) instead of gcc.
  • Change your makefile to link your app with with the CUDA compiler (nvcc) instead of ld.
  • Add -lcuda to your linker flags(LFLAGS) in order to link with the CUDA shared libraries.
  • Remove -fno-pie and -m from your linker flags.

11.4.7. Modify your code

Add to your code.

#include <cuda.h>
#include <cuda_runtime.h>

Instead of using regular malloc() to allocate the memory for the pBuf parameter in the function WDC_DMASGBufLock(), use cudaMalloc().

Make sure that the dwOptions parameter of WDC_DMASGBufLock() contains the DMA_GPUDIRECT flag.

Add the following code to enable synchronous memory operations with your DMA buffer (pDma->pBuf in this example)

int flag = 1;
if (CUDA_SUCCESS != cuPointerSetAttribute(&flag,
CU_POINTER_ATTRIBUTE_SYNC_MEMOPS, (CUdeviceptr)pDma->pBuf))
{
printf("cuDeviceGet failed\n");
return;
}

Use CUDA functions to access the GPU memory such as: cudaMemcpy(), cudaFree() etc. Using regular memory management functions on pointers to GPU memory might lead to crashes.

⚠ Attention

Calling WDC_DMASGBufLock() with DMA_GPUDIRECT flag with a buffer allocated with regular memory buffer (not allocated using cudaMalloc()) will result in an Internal System Error (Status 0x20000007).

11.4.8. CMake Example

If using CMake to compile your code – use the following recipe as a guide.

cmake_minimum_required(VERSION 3.0)
set(WD_BASEDIR ~/WinDriver) #change according to your installation path
project(my_wd_gpudirect_project C)
include(${WD_BASEDIR}/include/wd.cmake)
include_directories(
${WD_BASEDIR}
${WD_BASEDIR}/include
)
set(SRCS my_wd_gpudirect_project.c)
add_executable(my_wd_gpudirect_project ${SRCS} ${SAMPLE_SHARED_SRCS})
#link with and libwdapi1620 and libcuda
target_link_libraries(my_wd_gpudirect_project wdapi${WD_VERSION} cuda)
set_target_properties(my_wd_gpudirect_project PROPERTIES
RUNTIME_OUTPUT_DIRECTORY "${ARCH}/"
)
#remove definitions to allow compilation with nvcc
remove_definitions("-Wno-unused-result -Wno-write-strings ")
set(CMAKE_SHARED_LIBRARY_LINK_C_FLAGS "")
#change compiler to nvcc
set(CMAKE_C_COMPILER /usr/local/cuda-10.2/bin/nvcc)
#add GPUDIRECT definition to compilation
target_compile_definitions(my_wd_gpudirect_project PRIVATE GPUDIRECT)

11.5. FAQ

11.5.1. How do I perform system or slave DMA using WinDriver?

WinDriver supports the implementation of interrupt service routines and locking down DMA buffers into memory, giving you the physical addresses and lengths of the kernel DMA buffer.

Assuming you want to implement slave DMA for an ISA card, you will need to write the code to program the DMA controller yourself. There is no specific API to program the system DMAC on PCs, but you can use the generic WinDriver API for direct hardware access and DMA allocation from your application
(see specifically WDC_DMAContigBufLock(), WDC_DMASGBufLock(),
and the WDC_PciReadCfg8() / WDC_PciReadCfg16() / WDC_PciReadCfg32() / WDC_PciReadCfg64()
and WDC_PciWriteCfg8() / WDC_PciWriteCfg16() / WDC_PciWriteCfg32() / WDC_PciWriteCfg64() or the lower-level WD_DMALock() and WD_Transfer() APIs).

11.5.2. I have locked a memory buffer for DMA on Windows. Now, when I access this memory directly, using the user-mode pointer, it seems to be 5 times slower than accessing a “regular” memory buffer, allocated with malloc(). Why?

“Regular” memory (stack, heap, etc.) is cached by the operating system. When using WinDriver DMA APIs, the data is non-cached, in order to make it DMA-safe. Therefore, the memory access is slower. Note that this is the correct behavior for DMA.

When performing Contiguous Buffer DMA, you can set the DMA_ALLOW_CACHE flag in the dwOptions parameter of WDC_DMAContigBufLock(), or directly in the dwOptions field of the WD_DMA structure that is passed to WD_DMALock() (when using the low-level WinDriver API), in order to allocate a cached DMA buffer. When working on Windows x86 and x86_64 platforms, it is recommended to always set this flag.

If you have allocated the memory in the user mode and then passed its address to WDC_DMASGBufLock() or to the low-level WD_DMALock() function in order to lock a Scatter/Gather DMA buffer, then calling WD_DMAUnlock() will unlock the memory buffer and it will now function like other “regular” memory in terms of access speed.

11.5.3. My attempt to allocate and lock a 1GB DMA buffer with WinDriver on Windows fails. Is this a limitation of the operating system?

WinDriver does not impose any inherent limitation on the size of the DMA buffer that can be allocated using its DMA APIs. However, the success of the DMA allocation is dependent of the amount of available system resources at the time of the attempted allocation. Therefore, the earlier your try to allocate the buffer, the better your chances of succeeding.

For contiguous-buffer DMA allocation, there must be enough contiguous physical memory for the allocation. On Windows, WinDriver allows preallocation of DMA buffers to evade this, so please refer to the relevant chapter of the manaul for more information.

When allocating a Scatter/Gather DMA buffer that is larger than 1MB, using the low-level WinDriver API, be sure to set the DMA_LARGE_BUFFER flag in the dwOptions field of the WD_DMA() structure that is passed to WD_DMALock(). (When using the high-level WDC_DMASGBufLock() function, this flag is already handled internally by the function.)

The DMA buffer allocated by WinDriver uses page-locked memory, to ensure a safe DMA operation. This memory is allocated from Windows' non-paged kernel pool of memory. The size of this pool is fixed at boot time by a Registry setting. You can increase the allocated memory by increasing the value of the NonPagedPoolSize Registry entry, found under HKEY_LOCAL_MACHINE\SYSTEM\CurrentControlSet\Control\Session Manager\Memory Management.

Sometimes, there is enough contiguous memory, but there are not enough page table entries to map the memory. Even after increasing the value of the relevant Registry entries, the memory allocation might still fail, specifically when trying to allocate a very large buffer (such as 1GB). The solution in this case is to try decreasing the size of the buffer you are trying to lock, until you succeed.

⚠ Attention

Please note that the WinDriver DMA allocation APIs ((WDC_DMAContigBufLock() / WDC_DMASGBufLock() / WD_DMALock()) also map the physical memory of the allocated buffer into virtual user mode space. Therefore, there must also be enough free virtual memory to enable the mapping of the entire buffer into the user space.

11.5.4. How do I perform PCI DMA Writes from system memory to my card, using WinDriver?

See 11.2. Performing Direct Memory Access (DMA) and 11.3. Performing Direct Memory Access (DMA) transactions.

11.5.5. How do I perform Direct Block transfers from one PCI card to another?

Locate and register both cards (using WDC_PciScanDevices(), WDC_PciGetDeviceInfo() and
WDC_PciScanDevices()). At least one of the cards must be PCI DMA Master Capable.

Program it with the physical address of the Slave card. Obtaining this address is possible by using pciCard.Card.Item[i].I.Mem.pPhysicalAddr, set by WDC_PciGetDeviceInfo() for the slave card.

Refer to the DMA section of this manual for more info regarding programming DMA using WinDriver.